|
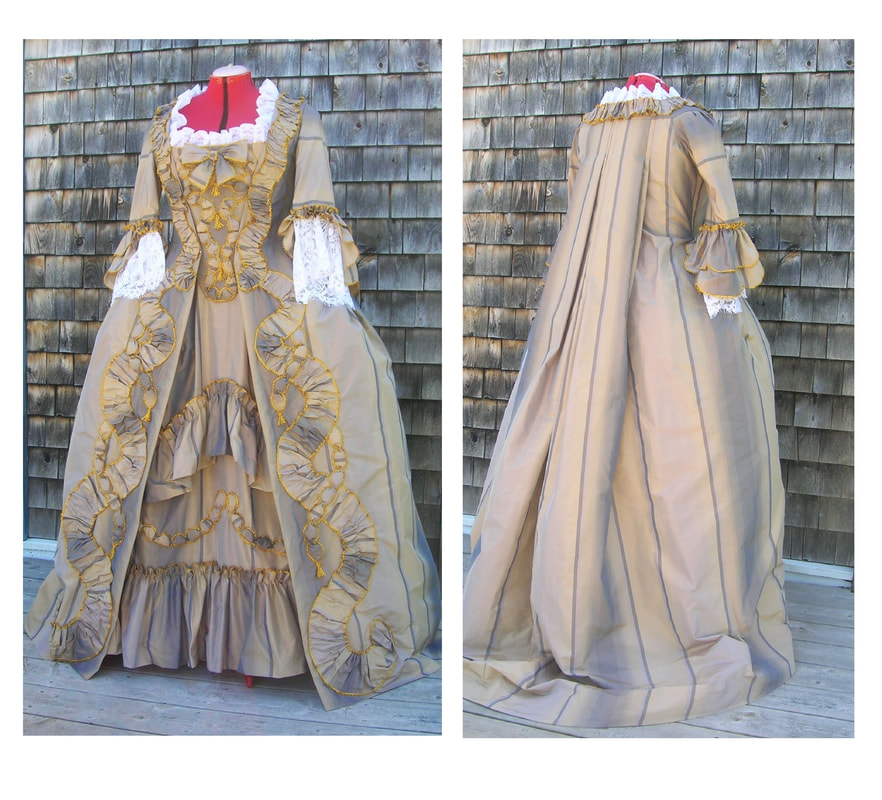
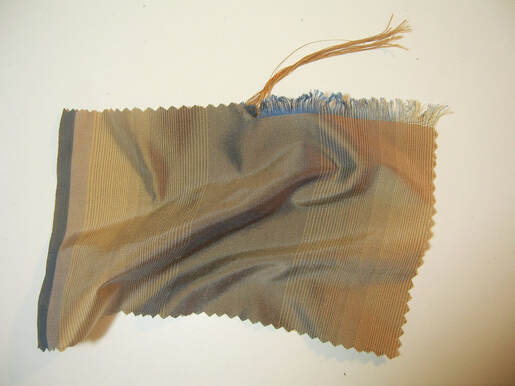
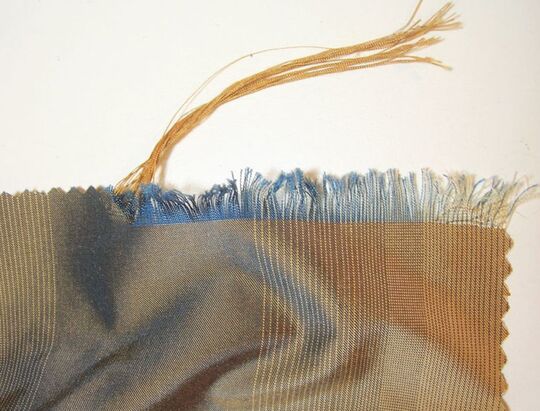
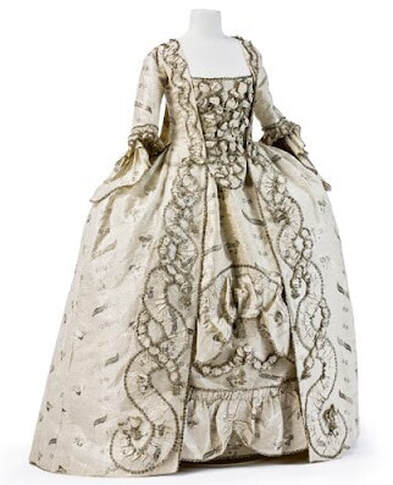
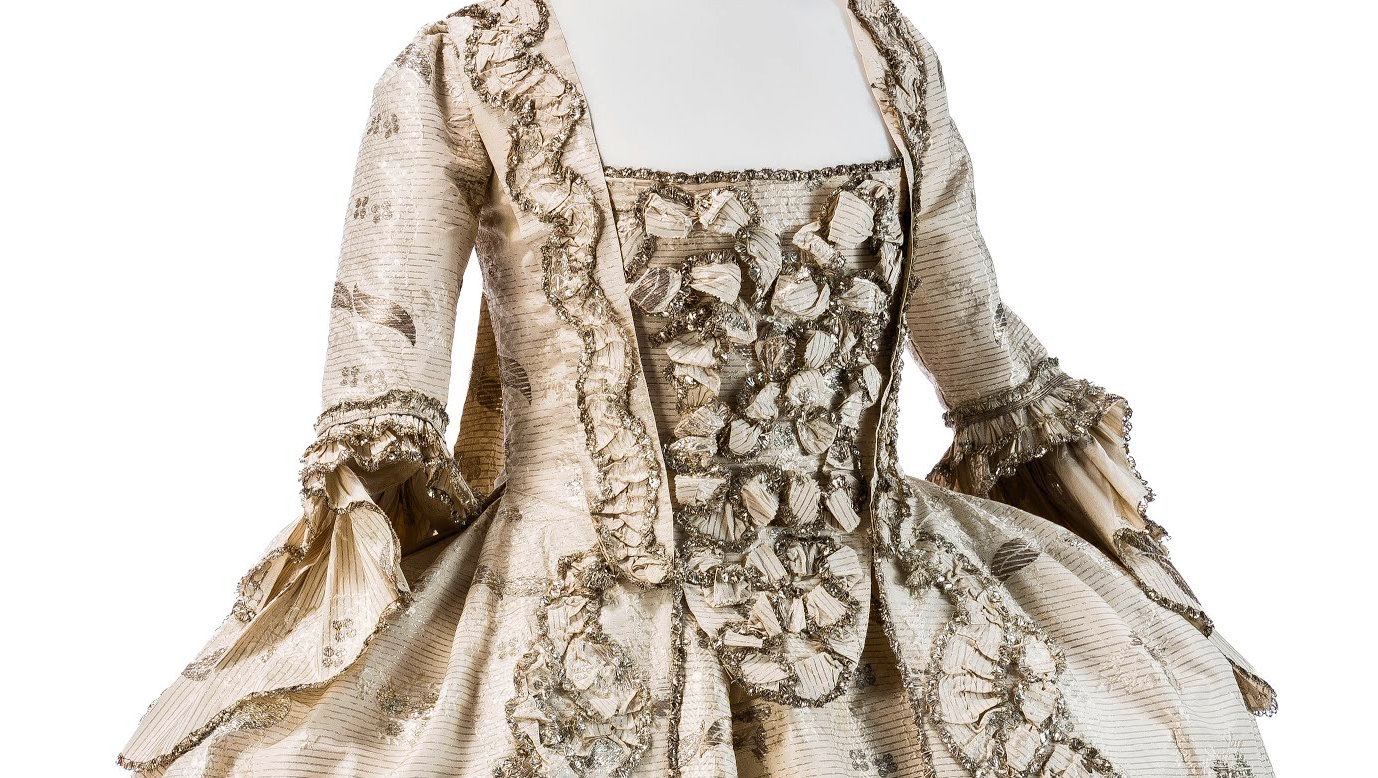
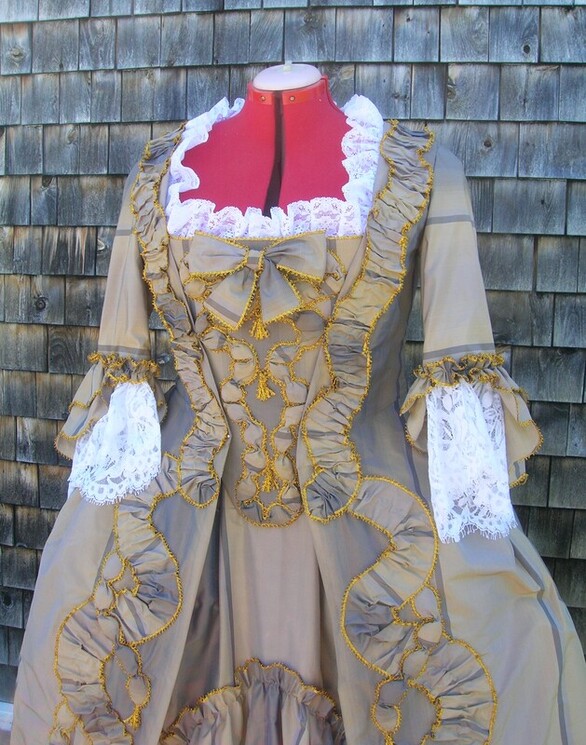
It's hard not to love the graceful beauty of the 18th century robe à la française (often called in English a "sacque" or "sack" gown), with its elegant lines and ability to flatter practically any woman of any age and shape. It's no wonder this style remained in fashion, with a number of variations, for nearly five decades of the 18th century, from the late 1730's to the late 1770's. For this project, I wanted a silk robe à la française in a more formal style (what in 18th century France might have been termed a "grand habit"), something appropriate for evening wear in an upper class setting: a dinner or evening soirée at a château! Although 18th century sacques all shared common construction features, what set more formal styles apart were the textiles, the extent and type of surface embellishment, and the size of under-structure worn with it. The pinnacle of formality in sacques were the court gowns ('robes de cour') of the 1760's and 1770's worn over ludicrously wide panniers. This was not the extreme I was looking for, but something "moderately" formal, which relied on a balance of form and embellishment rather than mere outsized grandeur! Creative Imaginings & Inspiration:If you regularly do historical sewing, you'll understand this part of the process! Sometimes in initially conceptualizing a project, the final image seems to have great clarity, but at other times it's more nebulous and coalesces out of inspired parts. In this case, the textile intrigued me, and I would say even called to me to give it form -- a length of 140cm (55") wide, iridescent silk, in an "shot" weave, made up of gold and blue threads, which from a distance produced an overall hue of warm taupe. The question was: what form? All it took to spark the project shown in the finished pictures was just the right 18th century inspiration, which came from an extant formal (but not "court") gown of ca.1750-60, said to be of French origin, currently held in a German museum. (I believe these photos were posted online by someone who viewed the gown in person, but I unfortunately can't provide photo credits. I'd be happy to do so if anyone recognizes them and can give me details). Calculations:My first task was to determine how many metres of my silk would be required to create the gown I had in mind. The basic robe à la française is actually an intrinsically simple garment, consisting primarily of vertical panels of fabric pleated and shaped to fit an underbodice (often called "lining") of linen. My 140cm wide (55") silk was approximately twice the historical 18th century silk width, which made it easy to visualize the entire gown made from just two lengths of full-width silk, with one centre back seam and the front edges along the selvedges. This is the simplest of possible arrangements to create a sacque, relying on the fortuitous width of a modern textile. Now, I know there are some people who might say that in order to precisely replicate 18th century construction, modern wide silk fabric should be cut in half lengthwise and re-seamed (as if it were an historical narrow textile), or -- perhaps even sillier in my opinion -- "faux" seams should be made down the centre of the entire length of modern fabric, to mimic historical widths. This seems to me to be rather irrational nonsense, like deliberately building an unnecessary flaw into the process! Personally, I believe the real spirit of 18thC. garment-making was to efficiently maximize the use of available material, and minimize waste wherever possible. I have absolutely no doubt that if an 18thC. maker had had access to fabric 140cm wide, he or she would have used it in the most effective way possible, minimizing unnecessary cutting or seaming. Now that I've got that pet peeve off my chest (I hope you'll forgive me!), here are the simplified, rough calculations for making my gown and matching stomacher:
If you'd like to delve further into calculating yardage for an 18th century sacque, see my article on the topic here: Planning the Order of Construction:This is a crucial step in constructing any garment, but especially important when making historical clothing of any kind. If you've never made an 18thC. gown before, it's a good idea to actually write out the planned steps for making your project. In fact, it's such a good idea that I'd recommend never skipping this step unless you've made several sacques -- it may save you frustration and grief later. I've made enough sacques to know the order of construction well without making notes, but I still take a few moments to visualize the process before starting. Here are my usual steps, in order, for constructing a robe à la française:
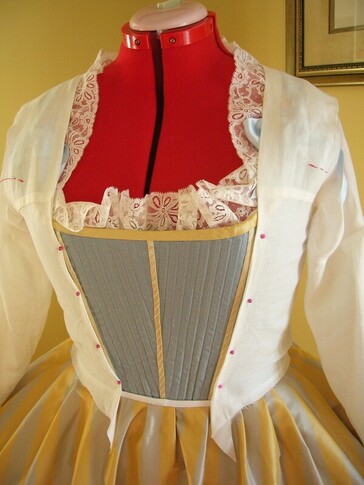
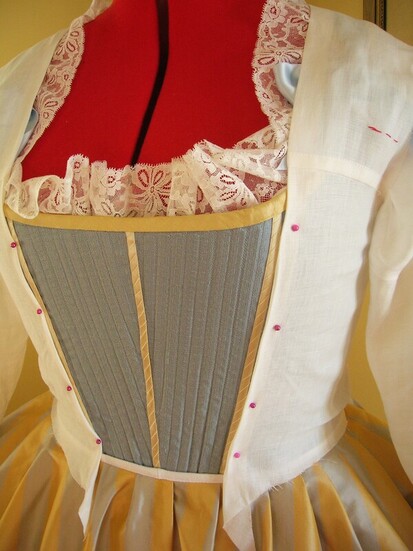
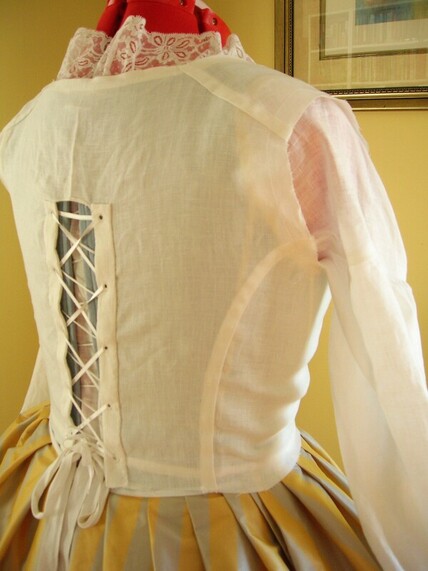
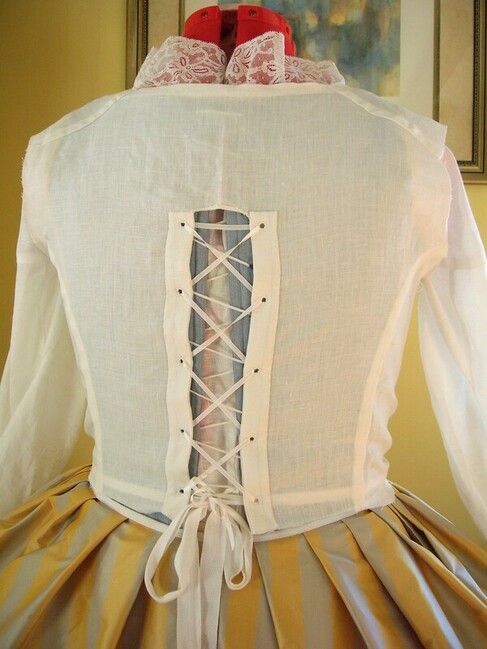
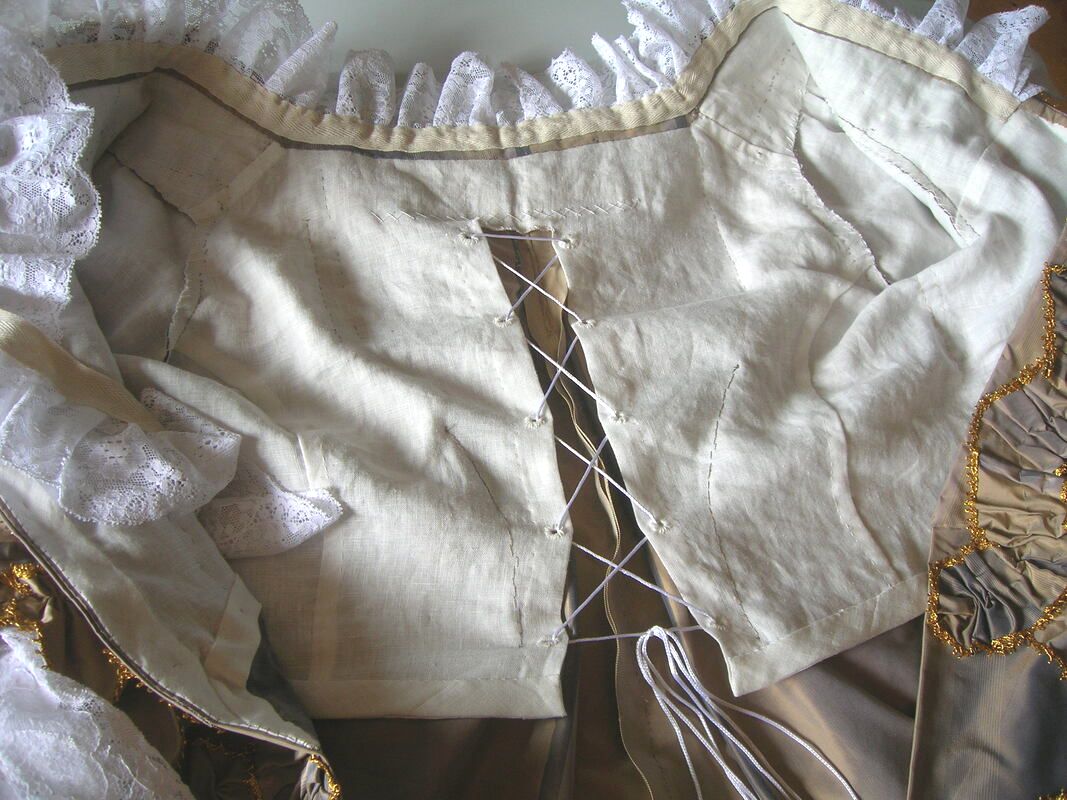
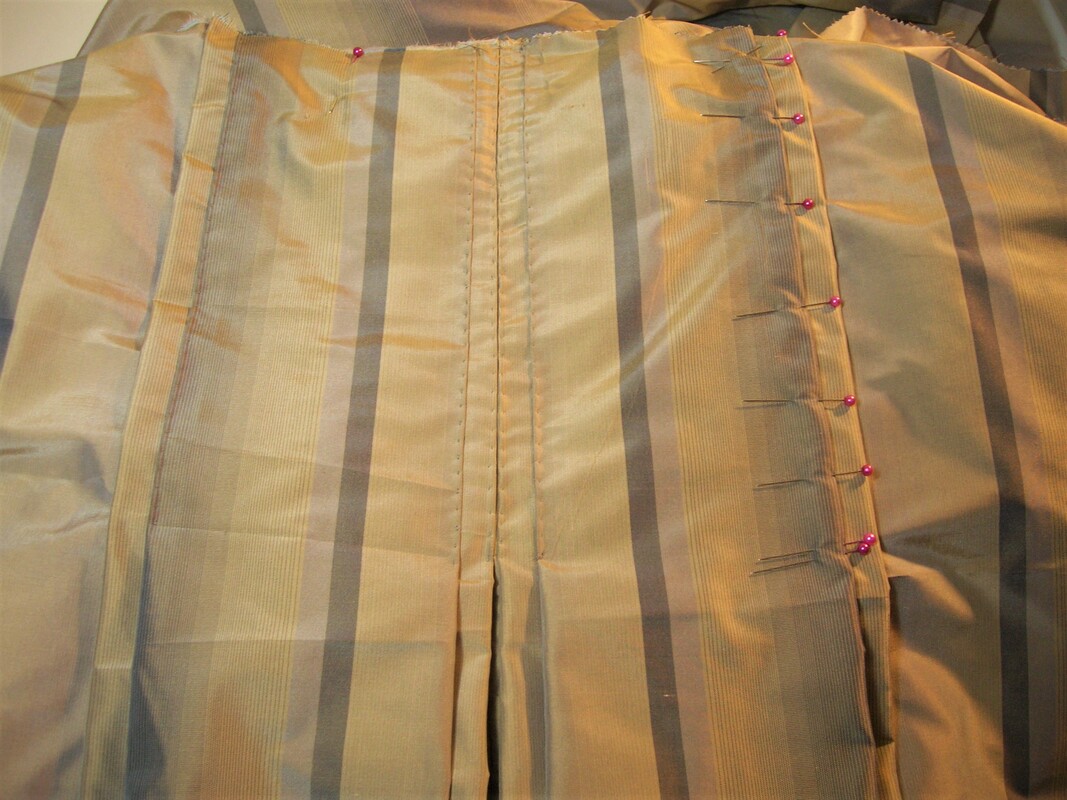
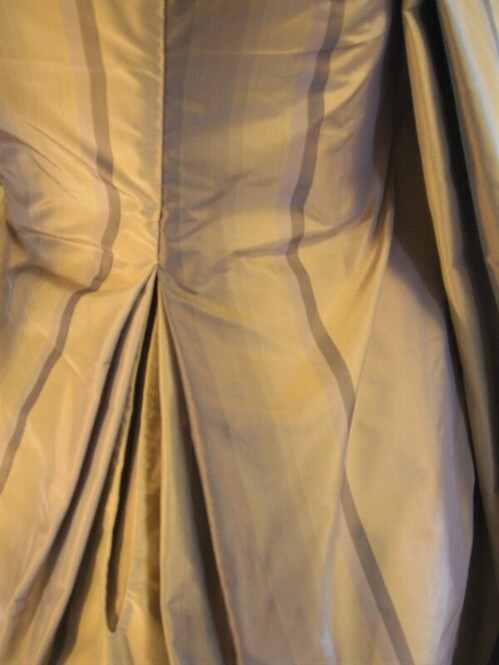
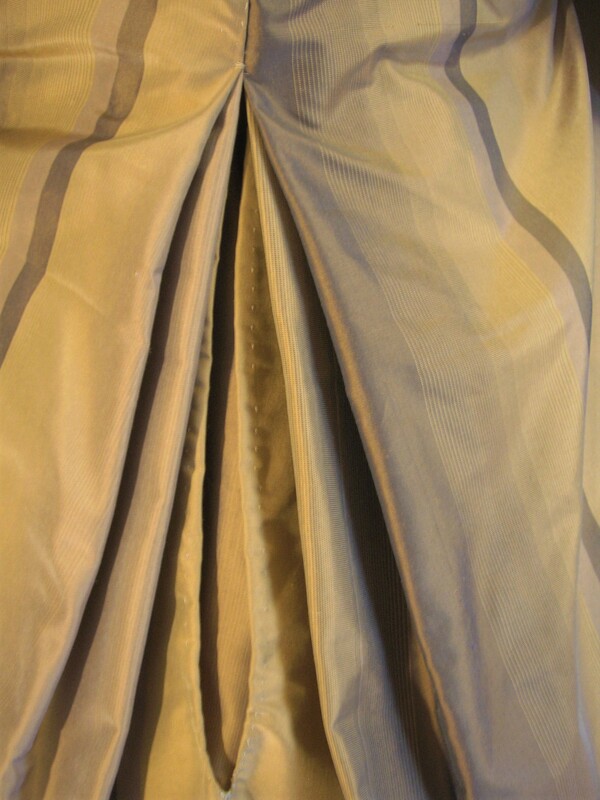
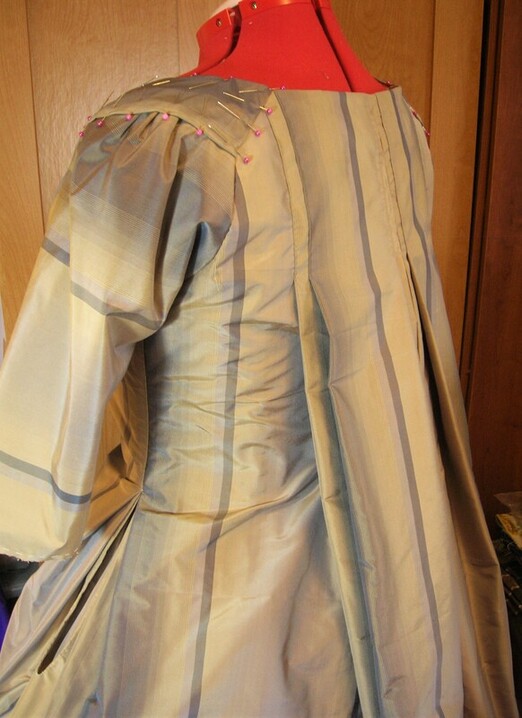
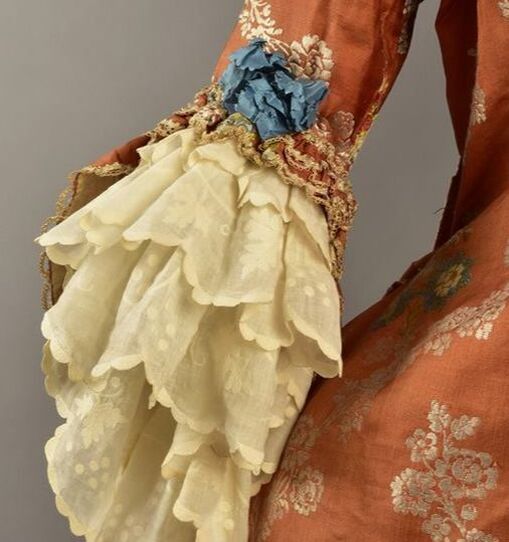
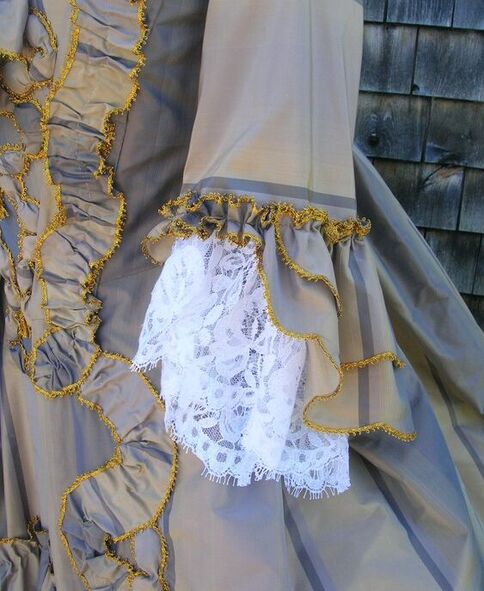
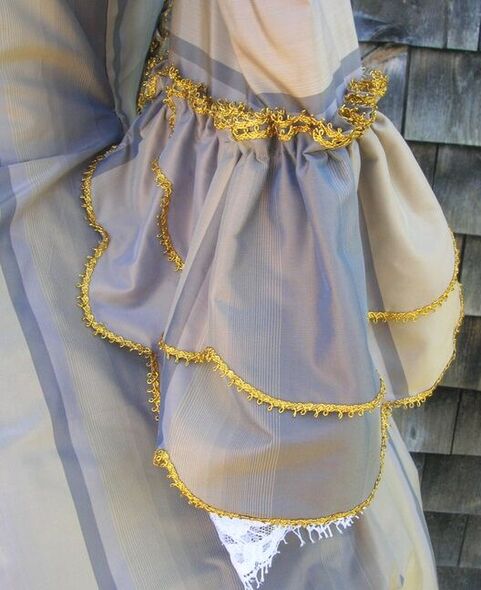
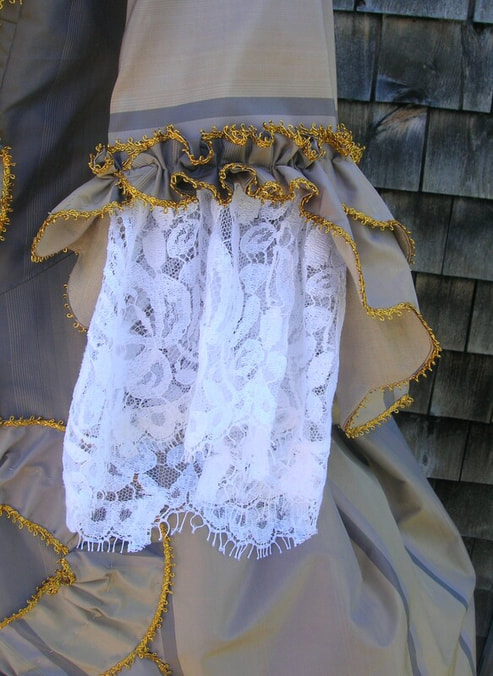
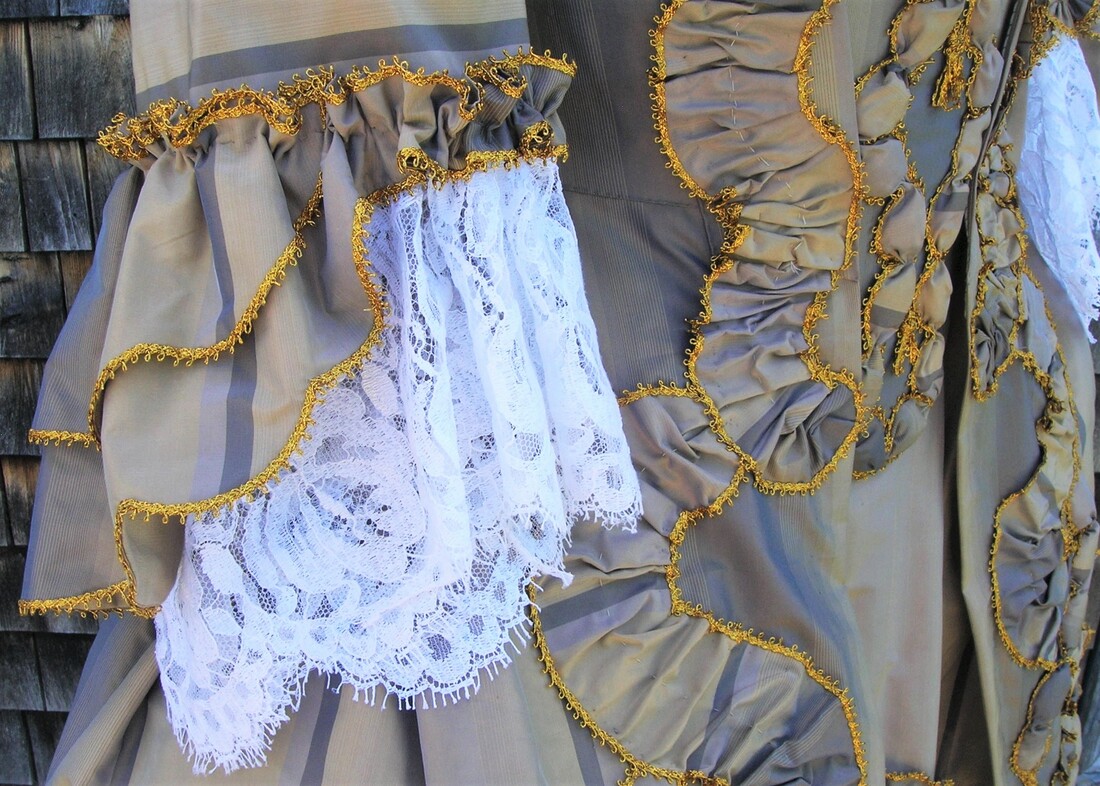
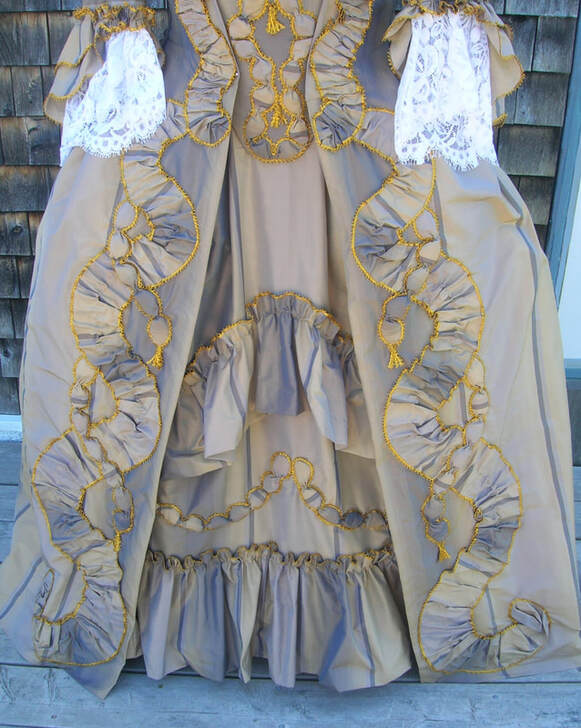
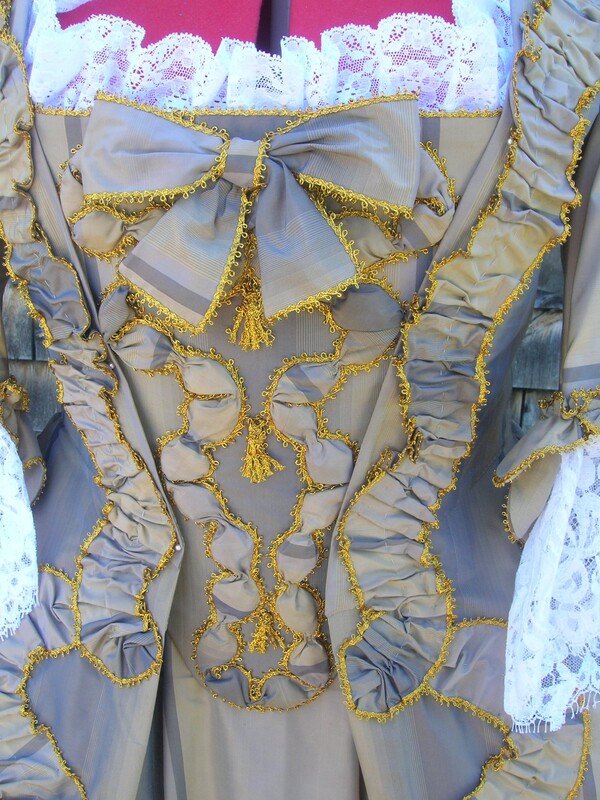
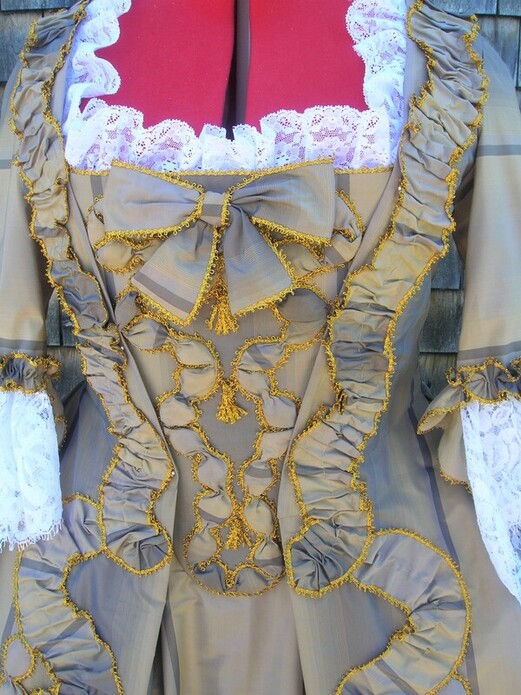
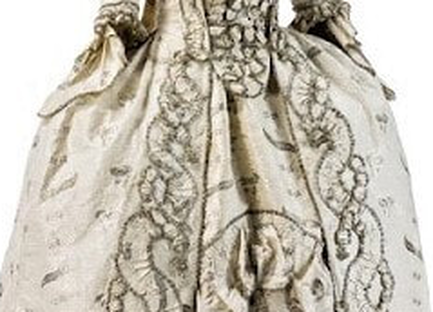
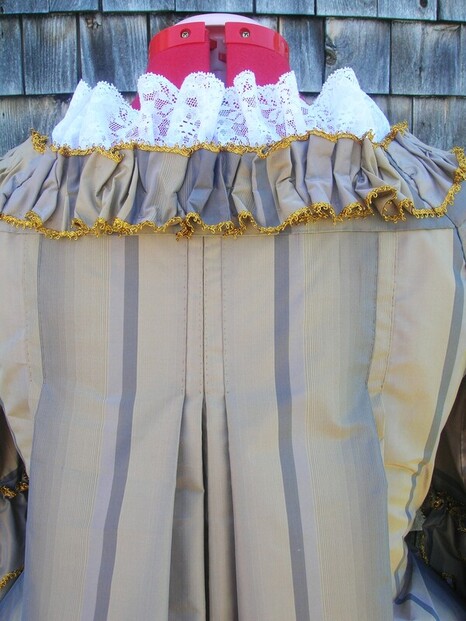
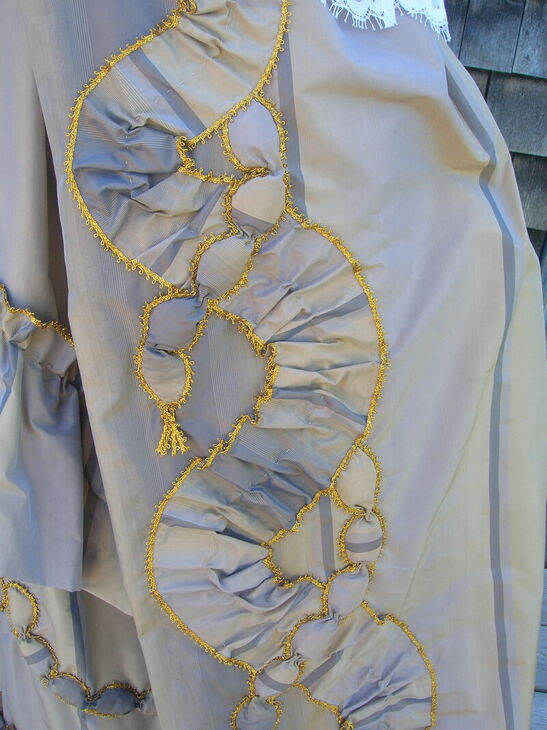
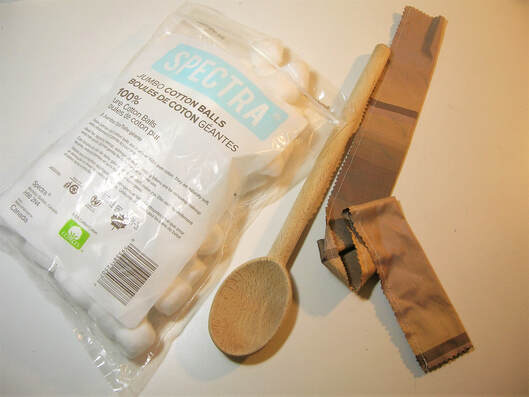
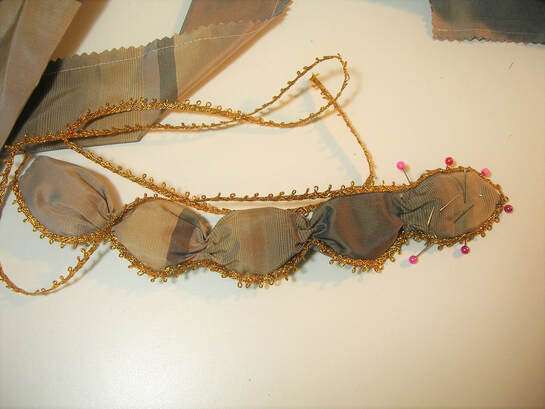
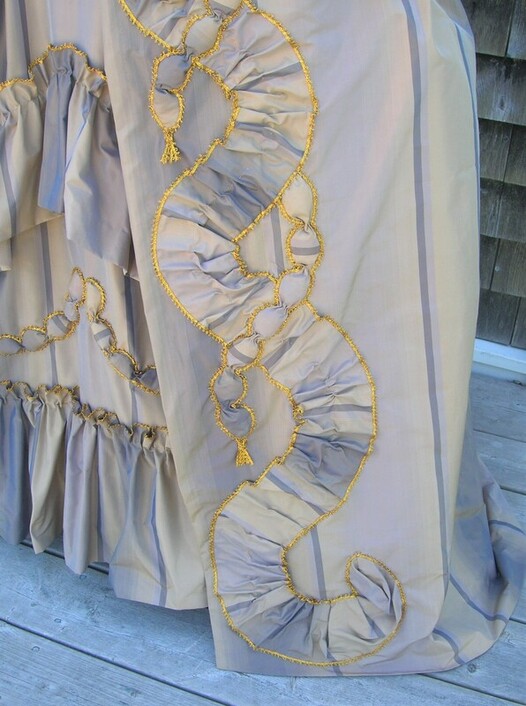
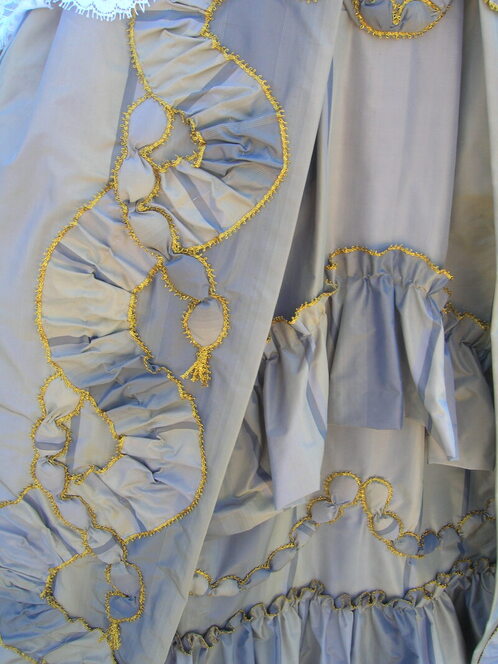
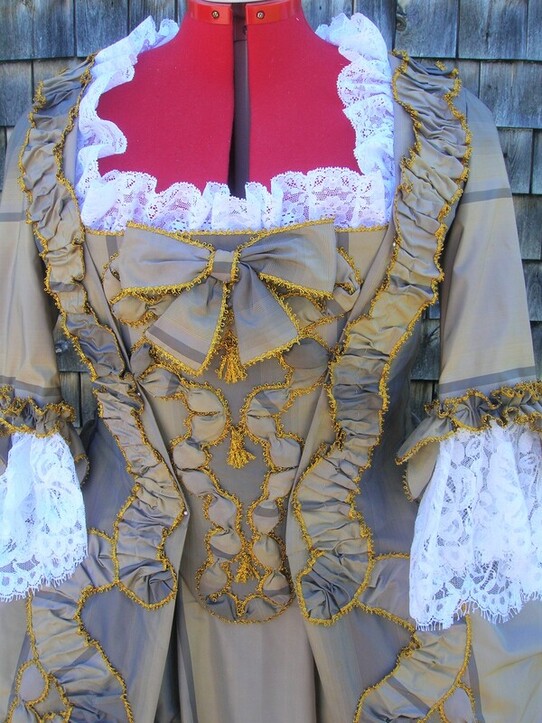
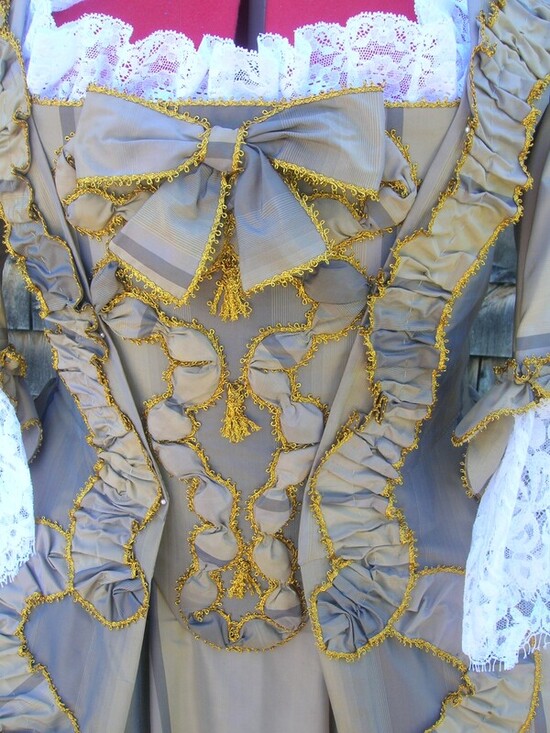
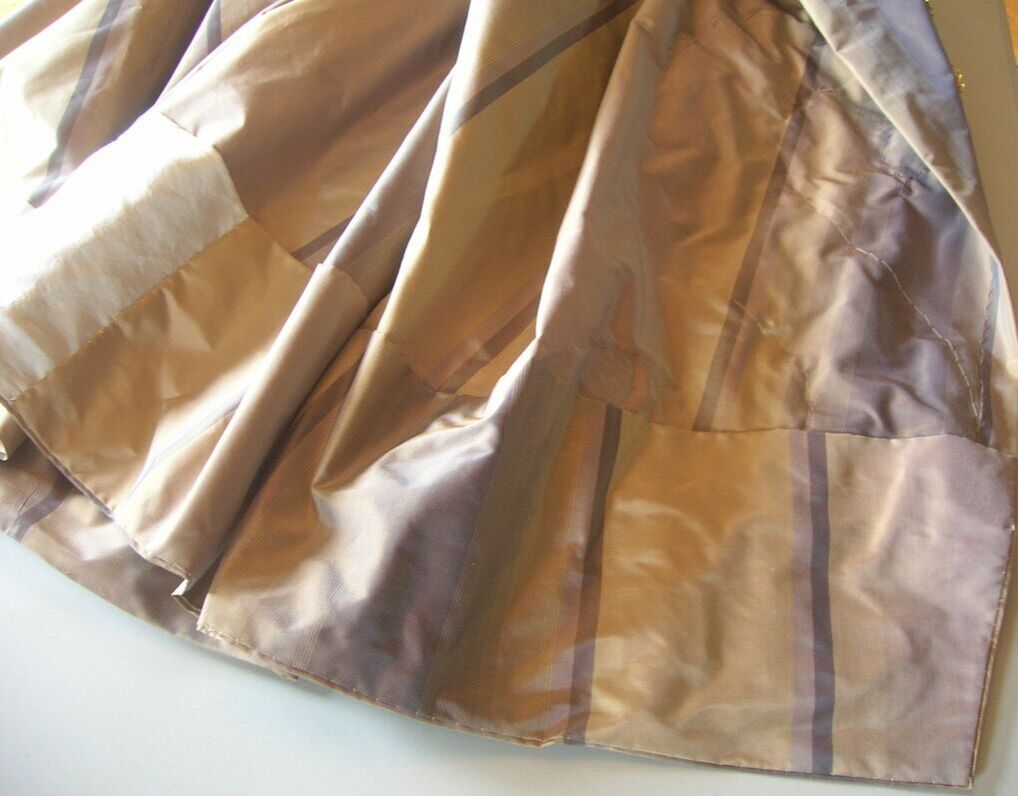
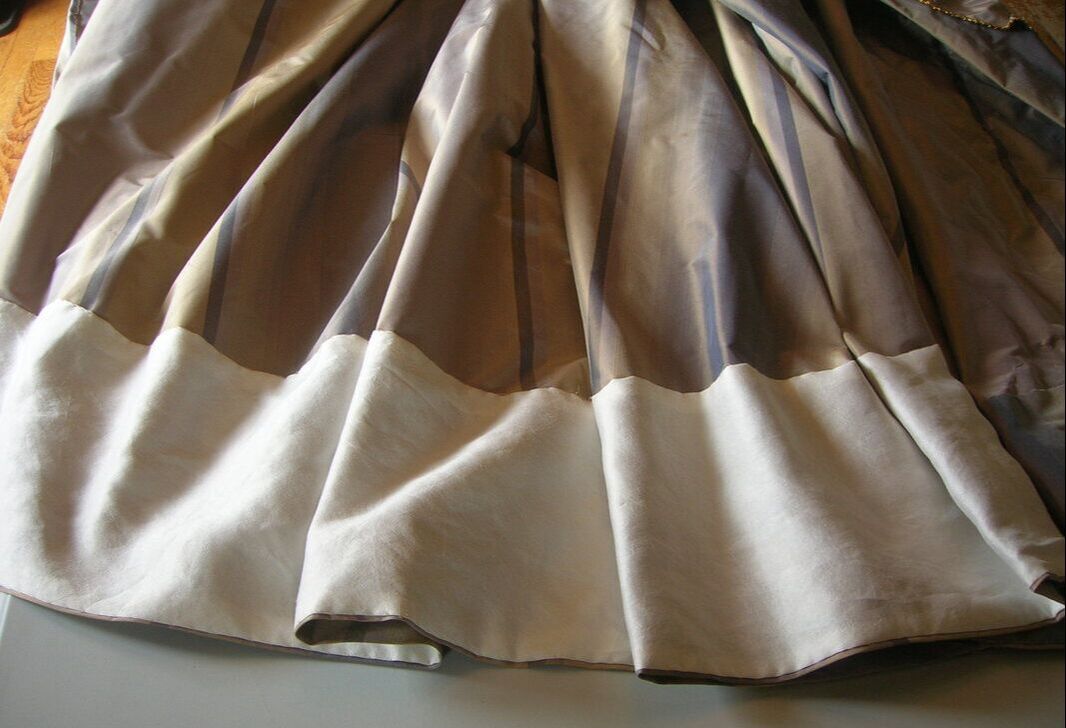
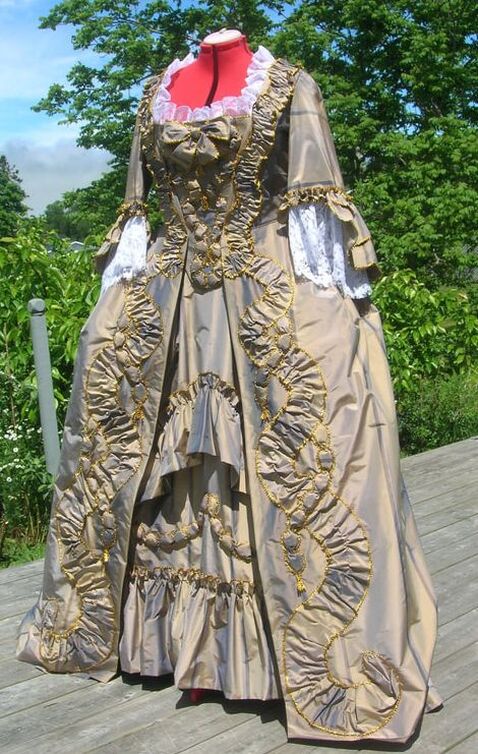
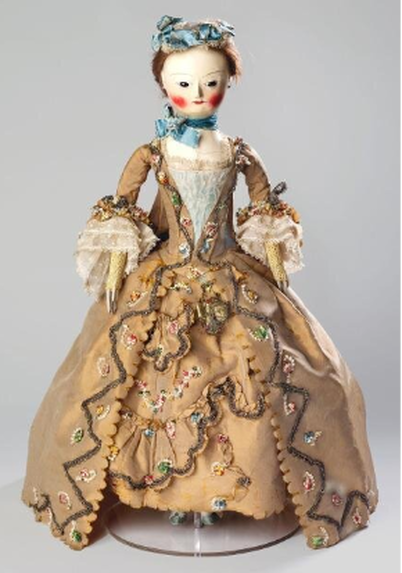
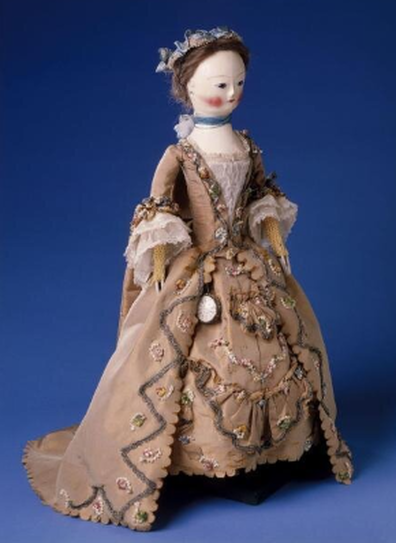
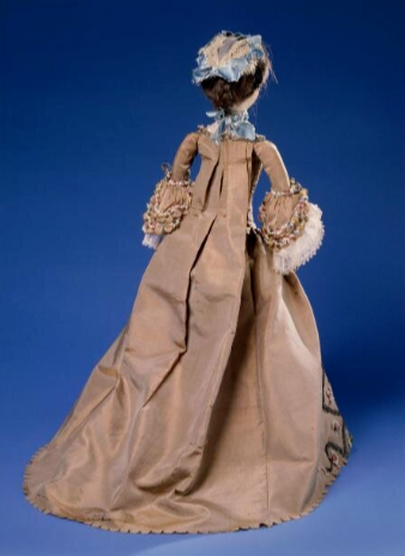
Foundation First!Every 18th century gown I make starts with a carefully fitted linen foundation. Many texts will refer to this as a "lining", but this is really a misnomer, as a "lining" is usually something that provides a smooth inner surface for a garment. In a very real sense, an 18th century lining is the structure, and the outer garment is the smooth surface application. So I prefer to think of an 18th century lining as a foundation, a basic understructure perfectly fitted to the wearer's body, to which everything else is then attached. If you understand the concept of a foundation, you'll be leaps and bounds ahead in terms of designing and constructing your 18thC. gowns. Envisage the foundation as a scaffold on which the outer (visible) garment is built, layer by layer. The beautiful thing about a well-fitted foundation is that everything else mounted onto it will fit you! This frees you from the necessity of separately fitting and altering the "fashion" layers of the garment, and allows you to use your creativity in shaping the final garment. This, in my view, is why patterns for sacque gowns may be more difficult to work with to obtain a perfect fit than simply fitting the fabric to the person (or to a mannequin). The photos below show some aspects of the construction and fitting of a foundation for a gown of this type. You'll notice the open centre back laced panel -- this is something I always include in my sacque gowns, as it makes the finished gown easy to adjust for any slight weight gain or loss. This clever 18th century feature is unfortunately not possible for later centre-front closing English gowns, which must be accurately (and closely) fitted to the wearer's body size both at back and front. When creating a foundation, never hesitate to take in, let out, move or otherwise re-make seams, creating fitting darts in place (known as "fish" in 18thC. parlance), or even re-cut the foundation to a different shape or size. While we're on the subject -- why use linen for an 18thC. gown foundation? Well, for one thing, it's the textile that was historically used (at least up until the 1790's) for gown foundations, partly because it was a sturdy choice for the structural portion of a garment and much less expensive than silk, but also no doubt because it was understood to be breathable and comfortable as an interior layer. In addition, it protected the expensive gown fabric from direct contact with the body. There really is nothing to match linen for comfort, especially in warm weather. Even cotton will absorb and release less moisture and heat (and cotton in any case would rarely have been used for utilitarian purposes prior to about the 1780's). (Note: I do plan over the next few months to create a series of video tutorials on the process of making and fitting an 18thC. foundation -- watch for it on this site!). Draping & Shaping:I always find this part of the process the most satisfying -- and most anticipated -- step in creating a robe à la française, because this is when I begin to see the final shape of the gown take form. As with every sacque gown I've made, I start with the back panel. I like to do some initial folding, then I stand back and make sure that I'm happy with the width and arrangement of the pleats, and the way the textile falls. In the case of this fabric, with its uneven pattern of wide and narrow stripes, I needed to do some trial-and-error folding to get an attractive result that mirrored the striping on both sides of centre back. I then removed the panel temporarily from the foundation and secured the pleats with tiny prick-stitches, to within about 12.5cm (5") of the top edge. Once the pleats are secured, the back panel can be pinned and basted onto the back of the foundation, leaving an allowance of about 6.0 to 7.0cm (2-1/4 to 2-3/4") along the top for turning over to the inside, trimming, and basting down along the back neckline of the foundation. The next step is to create the pocket openings. In this case, since I was using the entire width of my modern 140cm wide silk for each side of the body, the only selvedges were at C.B. and C.F. Accordingly, the fabric was next draped around the torso area (to be certain of the placement of the pocket openings) and a vertical cut made from the underarm to just above waist level to shape the fabric to what will be the side seam (leaving a generous allowance on each side). The front and back areas of the fabric are brought together and pleated at the sides so that pocket placement can be determined. A careful cut is then made into the fabric at what would normally be the skirt side seam, about 20cm (8") straight down from waist level, to create the pocket opening on each side of the body. There is usually enough fabric on each side of the cut to allow for at least two moderately-sized pleats (for wearing ease, and to fit over the shape of the hoop-skirt at the sides). This may all sound very complicated, but actually it's just a matter of pleating up the fabric to fit over the hoop skirt or paniers at the sides, making sure enough width is left to go across the front of the torso to the edge of where the stomacher will be (leaving an allowance for finishing along the gown's front edge). For the pocket openings, I like to turn the edges to the wrong side twice to create a very narrow hem (which is then prick-stitched into place), tapering the turned edges to the bottom point of the cut. I always add reinforcing whip-stitches at the very bottom and a reinforcing bar tack at top, especially if there are no fabric selvedges (see photo above). From there, it's a matter of smoothing the front portion of the fabric over the foundation and along the side, then trimming away the excess fabric (usually these remnants are enough to make the shoulder and upper back finishing strips), neatly folding the edge of the front part of the fabric panel under so that it overlaps the back to create a side seam, and hand-sewing the seam in place through the foundation with prick-stitches. The sleeves and their flounces are constructed separately (which is why the bodice foundation has no sleeves). The sleeves are then mounted by hand into the armscyes and the finishing strip (shoulder strap) is sewn into place, preceded by the upper back finishing strip if needed. See the following section for more details on that part of the construction. During all of this process, never discard any remnants -- they can almost all be used for some part of the trimming! Flouncing AroundMy usual practice is to prepare the sleeves of a gown completely separately, then mount them into the gown. Normally this also involves designing, cutting and adding any flounces, cuffs or other trimming. In the case of this particular gown, I finished and mounted the sleeves first, then added the flounces. Either procedure will work, but adding the flounces after the sleeves are mounted does allow the maker to better judge how to arrange the flounces, and whether they need to be altered or adjusted in size. I won't go into the process of cutting and constructing the sleeves (since I've dealt with this in detail in other blogs), but I'll add notes here on the decorative flounces. I spent some time studying close-up photographs of a number of extant gowns with sleeve flounces before deciding on a final design. Considering that the flounces on my sleeves would need to support fairly heavy metallic trim, I decided a double flounce was sufficient, but that each need to be lined to prevent them from buckling into a flat shape from the weight of their trim when worn. Accordingly, I lined each one with a fine, lightweight mushroom-coloured linen, all applied by hand. This lining addition is seen in some extant mid-18th century gowns, such as the one below (you can just see the edge of the lining sewn to the flounce along the left). From Whitaker Auctions catalogue, date unknown. First I should mention that it seemed to take me forever to decide on the colour of the metallic trim for this gown! I originally wanted to use silver, but a test on some ruching was the end of that idea (too dull for the colour of the silk). I then decided to try using some light gold coloured metallic trim I had available, but -- alas! -- I had nowhere near the roughly 30 to 40 metres I'd calculated I would need. Hence the "old gold" coloured metallic trim you see in the photos, of which I had a whole lot available, actually over 60m., which meant I could be as lavish with decoration as I wished. It took me a while to adjust to what I initially felt was the wrong metallic tone, but ultimately, as a whole, it turned out to be a good foil for the restrained colouring of the silk. Once I'd finally decided on the edging trim, I could launch into the real fun of the project. The bottom edges of the sleeves were finished by turning sleeve and lining in onto each other and securing by hand (using a "point à rabattre sous la main", or underhand hemming stitch). I applied the metallic trim to all outside edges of the flounces, then ruched the top edge (including the narrow band along the front of the bottom flounce) to fit the bottom of the sleeve. The flounces were then securely tacked onto the sleeve bottom. (The following photos show the finished result). The engageantes seen in the photos were made from a high quality vintage French cotton lace I had purchased years ago, which reasonably mimicked the look of antique Belgian needle lace. These were added at the very end, once the gown was completed. Each engageante was cut in a semi-circular shape, gathered at the top and simply sewn onto a length of twill tape (which was then tacked to the inside of the sleeve). The same was done with the neck frill (filler). All the Pretty Additions:1. Serpentine Ruching on the Gown Front: For the ruching (meandering serpentine bands on the bodice, and on the gown front edges), there were two separate procedures. First, I designed the ruching to go around the bodice edges so that it would be a consistent width (allowing for a roughly 1.5 gathering ratio, a 1.0cm finishing hem along each lengthwise edge, and some additional length to allow for the meanders). I pieced the strip where necessary. The finished width needed to be visually appealing, but not so wide that it overwhelmed the bodice, nor so narrow that it looked insignificant from any distance. This is strictly a matter of applying an artistic eye for balance, not mathematics, so is entirely at the maker's discretion. After some "experiments", I decided that a 5.0cm (2") finished width would be about right. As with all the other ruched trim on this gown, I turned the two long edges to the wrong side by about 1.0cm (3/8"), and loosely hemstitched them in place (being sure to take just a tiny "nip" of fabric from the right side so as to make the hemming inconspicuous). I then applied the gold metallic edging with a modified prick stitch (essentially an uneven running stitch with the occasional diagonal tacking stitch for reinforcement). Next I ran a long running stitch down the centre of the strip, pulled up the gathers evenly, and arranged the ruched strip around the neckline of the bodice. The final step was to tack each long edge into place onto the bodice, using a running stitch with very short stitches on the surface, but longer ones on the wrong side. Here I want to point out that the very best thread to use for this type of application is, in my experience, Tire #50 pure silk. It comes in a vast array of colours, is surprisingly strong, and practically disappears into silk fabric. There is really nothing to surpass it for fine hand sewing on surfaces of silk textiles! Gown (Skirt) Embellishment: For the gown (skirt) front edges, I calculated the total length I'd need and how much graduated width I wanted from top to bottom (taking into account a gathering ratio of about 1:5, and adding sufficient extra length for the serpentine arrangement). I added 2cm to the calculated width of each strip, and cut each one out with pinking shears along the lengthwise edges (I had to do some lengthwise piecing, but this was easily hidden later, in the ruching folds). The biggest challenge where this embellishment was concerned was to ensure that the wide, darker (ombré) bands of the taffeta's stripe pattern were arranged evenly on each side -- I didn't want a patchwork quilt look, but a visually symmetrical arrangement of colour and stripes on each side of the gown. That took some forethought! But I think I succeeded nicely (see photos below) -- and without having to re-cut anything. Where trimming an 18thC. replica gown is concerned, planning is always better than unpicking and re-doing! All of this trimming involved one or two preparatory "test runs" with short trial sections to be sure my calculations were fairly accurate, although in the end the trimming on a sacque must look artistically balanced and attractive from a short distance away, not be driven primarily by mathematical measurements. I then turned the long, pinked edges of each flat band under by 1cm and loosely hand-hemmed them onto the wrong side of each band. Next I carefully stitched the gold edging on by hand all along each finished edge. Once that was done, I ran a long line of hand gathering stitches (in matching silk thread) down the lengthwise centre of each band and very loosely pulled up the ruching. I then pinned one ruched band onto side onto the gown, manipulating the gathers as I went. The last step was to carefully hand stitch the band onto the gown from the outside, close to each long edge of the ruched band. I then repeated the process on the other side of the gown, matching up the ruching so the wide, darker coloured "ombré" sections were parallel to each other -- which was the biggest challenge! The puffed trimmings were done quite differently (see the next section). 2. Puffed Trim: On the extant ca.1750 gown from which I was designing my replica, the puffings were applied in three separate places: (1) as sort of trompe l'oeil meanders intertwined with the wide ruching on the gown skirts; (2) as a swag on the petticoat; and (3) on the stomacher. There were a few documented sources I was able to draw on in order to re-create this type of trim (including some very helpful close-up photos of extant gowns), but I had never been able to personally examine a gown with this type of embellishment. Ultimately, through a few trials and errors, I worked out a reasonable solution to reproduce the effect as accurately as possible. Although I was aware of some descriptions by historians of these puffed decorations being filled with wool batting, I was unwilling to wait a month or more to have an online order of wool batting delivered. As an alternative, I decided that ordinary cotton balls would work just as well! I couldn't recall ever coming across an explanation of precisely how these "puffings" were constructed in the 18thC. -- short of tearing the trim off an 18thC. gown to prove how it was made, I can't imagine how their construction could be determined. In the end, I found that the most maneuverable and reasonable method was to create a narrow "tube" for each length of trim, then stuff each segment with cotton wool (using a large, long, fat wooden spoon), closing the end of the segment by "pinching" the tube with a few stitches, and then going on to the next segment. Once each length of "puffings" was complete, I hand sewed the gold trim onto all the outside edges. I had experimented with sewing the gold trim on before stuffing the sections, but this tended to create a bit of an untidy final product, and made it very difficult to control the shape while stuffing the segments. I suspect that on some 18thC. gowns with larger scale "puffings", this type of embellishment may have been created and applied differently than my method, i.e. by means of a single, flat band of fabric (perhaps with trim already applied), manipulated into puffed segments as the maker worked, stuffing each one separately, turning the edges under and stitching them down onto the gown. However, for the size and shape of the puffed trim on my gown, this might well have been an almost impossible task! In the end, I was fairly pleased with the result. I followed the pattern of puffed trim seen on the extant gown and petticoat, including the intriguing trompe l'oeil serpentine puffings on the front edges of the gown: 3. A Matching Stomacher: The stomacher was made of an outer layer of silk taffeta to match the gown, with inner layers of buckram and tan coloured mid-weight linen, and lightweight tan linen lining on the side that would be placed against the body. The stomacher was boned (between the buckram and inside linen layers) with 4 long, evenly-spaced bones to give the piece strength and rigidity. I used the same method of creating puffs to embellish the outside of the stomacher as I had used for the gown itself. Although I ultimately created a design on the stomacher that was somewhat different from that of the 18th century original, like an 18th century maker I tried to keep it in harmony with the rest of the gown. 4. Tiny Tassels: It took some careful observation on my part to notice that the extant gown which formed the basis for my design had little tassels added here and there in strategic places on the gown, much like decorative punctuation marks! After some fun experimentation with my metallic trim, I managed to fashion little 3cm long tassels that looked much like the 18th century originals, and positioned them on the gown in a similar way. I also felt they might look good on the stomacher, so I added one in each of the open spots on the stomacher surface (see photo above). Final Touches:One final step, after completing the hem of the gown, was the addition of a hem facing. I add a hem facing to all my silk gowns (especially those with a train), mainly to protect the underside of the fabric from soiling and wear, but also to provide extra loft and body to the gown's hemline. My usual method is to make the front portions of the facing by piecing any scraps of gown fabric I may have left, and the rest of the facing from a plain, less expensive silk or fine cotton. This way, the inside front facings will not be conspicuous if the front edges open out slightly when walking or sitting. Generally I make the facings at least 10cm (4") deep, to ensure the lower edges of the skirt are well protected. Depending on the shape of the hemline, the facing may need to be either cut to the shape of the lower edge, or shaped with tucks to fit. Normally I turn the bottom edge of the facing in, placing the finished edge just barely above the gown's hem. I then loosely slip-stitch the bottom edge of the facing onto the gown's hem allowance. Since the whole purpose of the facing is to be replaced if necessary, the application stitching shouldn't be made so that's too difficult to remove -- fairly long, loose stitches are best. If the gown silk is very lightweight, I simply cut the top edge of the facing with pinking shears (to prevent fraying), then loosely hem-stitch it in place, taking very tiny "pecks" into the skirt fabric with my sewing needle, to avoid too many visible stitches on the outside. For a more substantial silk, which was the case with this gown in quite a sturdy taffeta, I usually turn the top edge in slightly, then stitch. Choosing a fabric to make the plain portion of the facing is important. A lightweight textile with a smooth surface, close weave and slightly crisp hand is best (it should in any case be lighter in weight than the gown fabric, but not too stiff). China silk, fine silk broadcloth or taffeta, lightweight low-slub silk shantung, lightweight silky cotton percale or fine pima cotton shirting, are all good choices. On wool gowns, linen can be used as a facing, but its rather rough texture may pick up more dirt than a smooth silky fabric, which will glide over rough or uneven patches of ground. A lightweight fabric won't pull down on the gown skirts, putting pressure on the attachment stitching (which could create tearing in the gown skirts). To attach the facing, use a thread that is equal in strength to, or weaker than the facing fabric: very fine silk or cotton thread works best on most facings. And so my formal gown was completed, with all the style points of a fashionable ca.1755-60 silk sacque. What I didn't expect, when I placed the gown in full outdoor sunshine to take additional photos (all the photos so far were taken in the shade), was that the effect of sunlight on the iridescent, shot taffeta, and on all the gold trim, would be practically blinding. Actually, this gown is not at all attractive in full sunlight, frankly I found it rather off-putting. There is just too much garish glinting and sparkling to assault the eye all at once -- in fact, the camera didn't really even capture the full effect! As the photo below will attest, bright sunlight provides anything but a subtle effect! However, dressy gowns of this type, made of taffeta, with metallic silver or gold trim everywhere, were never intended to be worn outdoors during the day, but were always meant to be seen in evening lighting. And not just modern evening lighting of course, but flickering candlelight, which would pick up occasional lovely glints of reflection, hinting at the wearer's social status and the total luxe of her gown. In the end, my purpose in making this replica was not primarily to wear it to a specific event (although I hope some day to have an opportunity to wear it in the type of candlelit setting for which it was designed), but rather to enjoy the journey of designing and making an authentically replicated 18th century gown. I realize it's probably clear that much more was involved in the hand sewing and embellishment work than might be obvious from the photos of the finished garment or my brief descriptions. All in all, over 100 hours of handwork was involved in re-creating this replica gown. Whether I'll be able to enjoy wearing it, or decide to offer it for sale remains to be seen. Still, I find the experience of creating these pieces is always worthwhile -- and extremely satisfying. It gives me a deep, close-up, and very unique personal appreciation of the skill and craftsmanship of 18thC. gown makers, and respect for the wonderful understanding they had of fitting garments to the human body. All of which is why I love trying to "follow in their shoes"! A surprising postscript...After making this taupe silk taffeta gown, I happened upon a startlingly similar design, in a very similar hue, from about 1750 in the collection of the V&A (Victoria & Albert) Museum. This doppelgänger, as it happens, is a doll, not a child's toy, but probably one of the many exquisite little ladies used in the 18th century to showcase the latest in (usually) French style, complete with all the undergarments and accessories. Despite ongoing wars between France and England throughout the 18th century, fashion dolls never failed to make their way to prospective customers, or dressmakers eager to see the newest styles from Paris. It's quite possible, given that this particular doll was so well and lovingly preserved for over 270 years, that (as the V&A suggests) this may have been a design for a wedding gown. Nothing, it seems, ever stops the fashion parade! I like to imagine that my ca.1750 silk taffeta gown would meet with 18thC. fashion approval!
2 Comments
11/11/2022 02:43:06 am
That was a nice blog happy to read your whole blog content keep sharing content like this.
Reply
Your comment will be posted after it is approved.
Leave a Reply. |
AuthorPatricia Preston ('The Fashion Archaeologist'), Linguist, historian, translator, pattern-maker, former museum professional, and lover of all things costume history. Categories
All
Timeline
March 2024
|

 RSS Feed