|
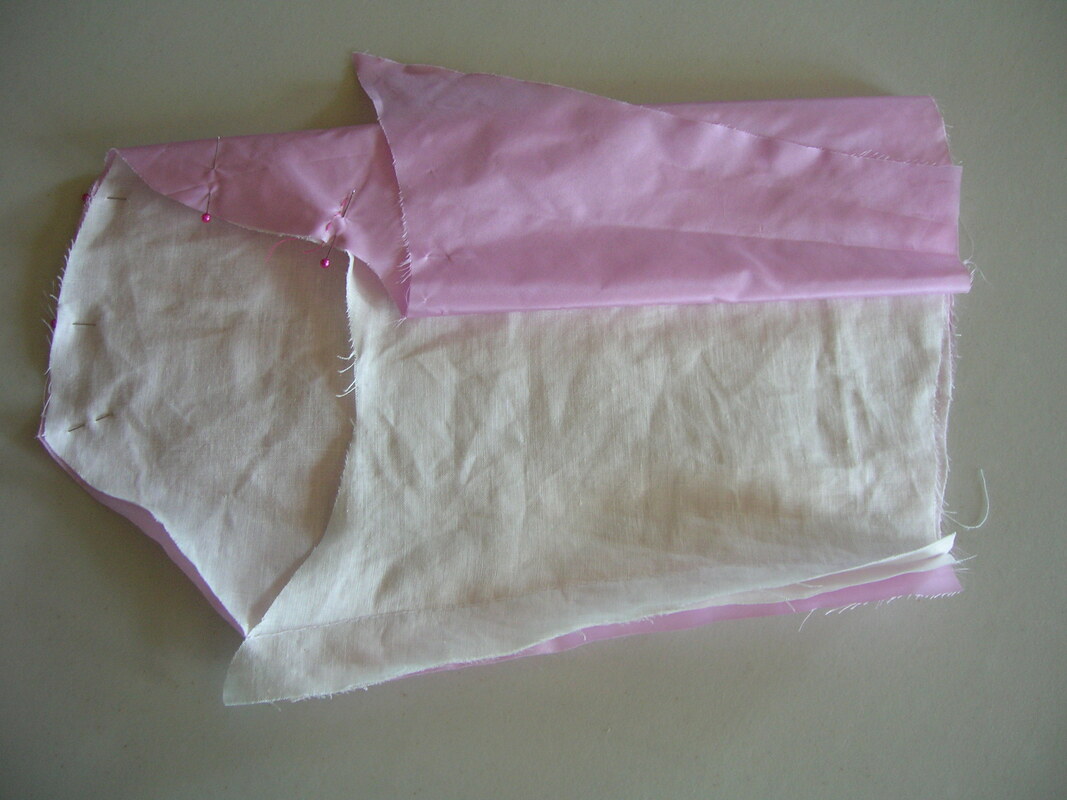
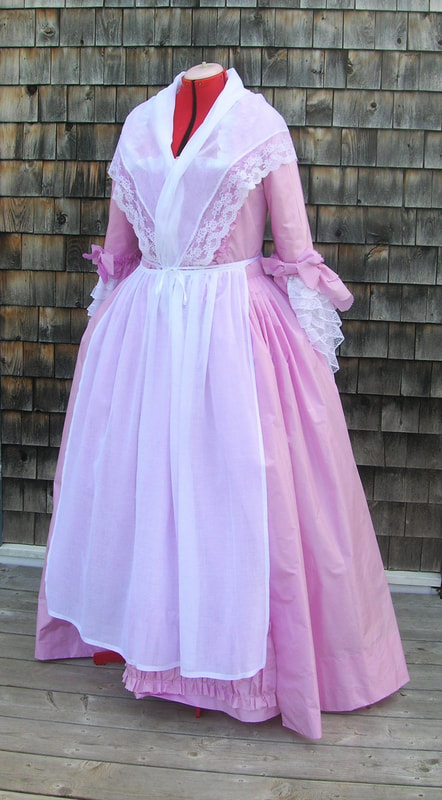
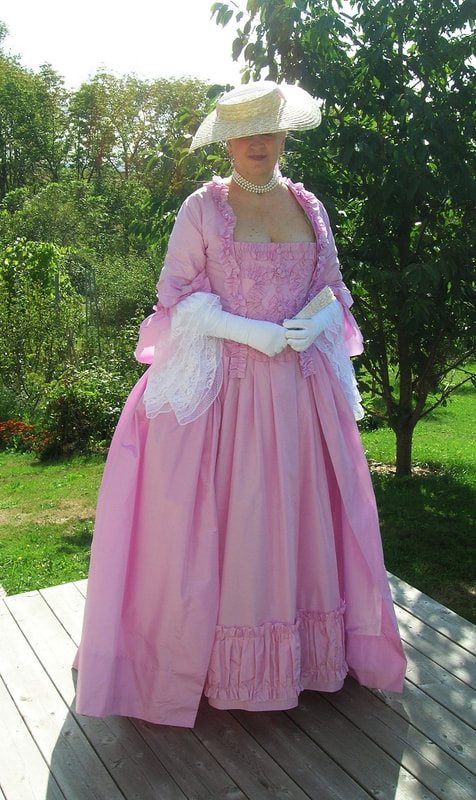
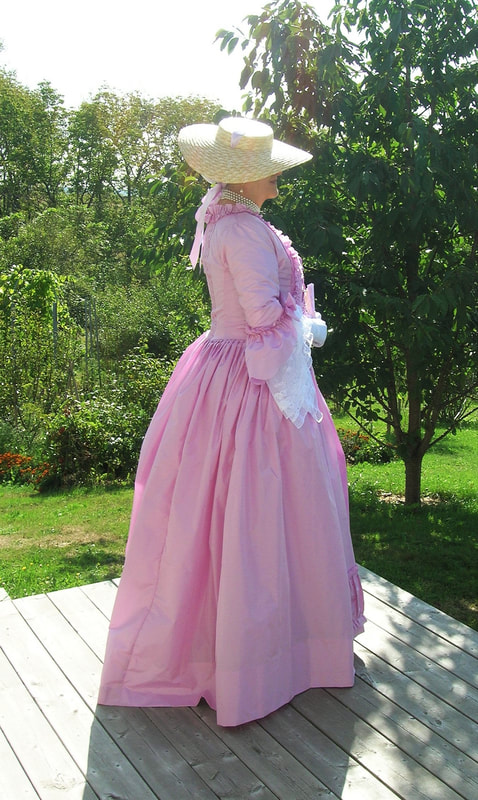
In the Pink! As of the date I write this (September 9, 2020), the project is nearing completion! I'm beginning to be able to see the final result. Best of all, despite definitely not being a pink person (I can't think of a single pink garment in my closet of "modern" clothes), I have to say that the colour of this beautiful iridescent silk has grown on me. Its tone shifts with indoor or outdoor lighting (more lavender with the latter), and the pleats and ruffles create little pools of reflection in the shot silk, which has a white coloured warp and bright pink weft. The camera unfortunately fails miserably at capturing the scintillating nature and luscious colour of this silk. (Click on "Read More", below right, to continue...) I want to add a note here about the taffeta itself in relation to historical pinking. I found this silk at a discount in a specialty silk merchant's shop nearly 20 years ago. It was old stock that had been put out for clearance because there were tiny, faint dots of stain at regular intervals near one selvedge (likely from the weaving machinery). I bought all 15 metres that were on the roll, knowing I could work around any flaws. The shop owner told me that this silk was European couture taffeta from the 1980's. It is very finely but densely woven, more so than any modern taffeta I've seen, and light as air, yet hard to get a pin or needle through due to the extremely fine fibres and tight weave. What I discovered during the process of making my gown is that, unlike modern taffetas I've worked with, this silk does not fray when pinked, even when "challenged" with deliberate abrasion. (The edges of the pinked trim on my yellow and silver française almost all frayed after one wearing and had to be carefully cleaned up with tiny scissors!). It occurred to me that this might possibly explain the successful use of pinking on historical taffeta gowns. So, as of today, the gown itself, including petticoat, stomacher, and trimming, is finished except for hemming and facing the gown skirts (photo below). Virtually everything has been hand-sewn, except for two of the main gown skirt seams that I needed to get done quickly on the machine in order to get on with the pleating. So far so good, except -- read on to the end to hear my saga of the fichu and apron! Here then is a brief overview of the steps done since the petticoat was pleated and hemmed: (Please click on 'Read More', below right, to continue) 1. Petticoat Trimming: In keeping with the visible embellishment of the petticoat in the Gainsborough painting, I opted for a simple, deep ruched furbelow near the bottom of the petticoat: This seemed to me to be about all that could be seen (or at least deduced) from the painting. As I mentioned previously, Gainsborough's almost impressionistic rendering of the Countess' gown makes it impossible to be exact about these details: The completed petticoat: seamed, trimmed, waist ties on: 2. Gown - Lining, Back Panel & Skirts, and Bodice: The first step of course in making a mid-18th century gown is to construct and carefully fit the linen lining. Once the lining fits, everything that goes on it later will fit. In this style of gown, a simple lining with a closed centre back (i.e. no C.B. lacing panel) is all that is required. As shown in the following photos, I made some minor adjustments to the lining to achieve a better personal fit and remove excess material. In the 18th century, these fitting "pinches" (similar to darts) were sometimes referred to as "fish", probably because most of them resembled that shape. I re-drafted my lining pattern accordingly. In retrospect, I probably should have re-cut the whole lining at this point, as it occurred to me that my very lightweight silk might allow some of the fitting alterations to show through. In the end however, very little was visible through the bodice. The all-important sleeve positioning marks in red silk thread are there to ensure the sleeves are properly rotated when mounted to the lining. I like to finish the front and bottom edges of these bodice linings prior to mounting the silk pieces, so that I can turn the latter in neatly onto the lining. However with more substantial material I'd recommend leaving the lining edges raw and turning them over onto the fashion fabric. Centre Back Panel: On these types of long-back English gowns, the centre back panel needs to be completed first, since it comprises both the back of the bodice and back of the skirt (to which the rest is attached). This part of the process involved simply pleating to a desired pattern on my mannequin, although it did take some time to get the pattern nicely arranged and symmetrical. My general guide (and template) was the moderately-pleated long-back English gown shown below, from around the same time period: A slightly curved centre back shaping seam ensures that the bodice back will hug the form nicely and creates an inverted centre back pleat that releases into the skirt. The pleats are then arranged on either side and neatly prick-stitched in place. In my case, I decided to do this stitching through to the linen lining as I felt it would give my very lightweight, delicate silk more support. I left the final 2.0cm or so at the bottom of each outermost pleat free to allow the back skirt panel to be seamed on and sewn to the bodice. In a more substantial material, the back panel can be removed from the mannequin (or model) once the pleats are arranged and pinned, and the pleating prick-stitched in place on a flat table. The Cut That Terrifies! In the photo below, the pleats have been sewn in place, and the remainder of the skirt panel has been created by a curved, horizontal cut on each side which follows just below the bottom edge of the lining. This cut need not be the cause of fear if done carefully. The two main points when doing this are: (1) to support the lower portion of the fabric to prevent tearing; and (2) to cut slowly but smoothly, following the gentle curve of the waist. Once cut, it's a good idea to neatly reinforce the inner point of the cut with a few tiny whip-stitches. These two loose sections will then be seamed to the remaining skirts and pleated up with them, to be stitched onto the bottom edge of the bodice on each side. The raw edges of the bodice have been pinned in their positions on the linen lining, leaving allowances for finishing. Attaching and Pleating up the Remaining Skirt Panels: The remaining skirt panels are cut as simple rectangles and seamed to the vertical edges of the skirts forming the centre back panel. However there is some judgment involved in cutting appropriate panel widths, based on the width of the fabric involved. In this case, for my narrow 90cm fabric, it made sense to use a half-width (45cm [18"]) for each side-back panel, and a full width for each front panel. This provided sufficient back shape in the skirt, since there was already close to a half-panel width as part of the centre back panel that would be pleated up together with each half-panel. It also permitted selvedges to be used for each side seam, making finishing of the pocket openings easier at the top. The photo below shows the side-back skirt panel attached to the back panel and pleated. The pleated portion of the back skirt panel has already been sewn to the back bodice, the front skirt panel (not visible in this photo) has been sewn to the side panel, and the pocket opening has been neatened. This photo jumps ahead a little, as the front/side bodice section has already been pinned on here (the pleated fabric visible underneath is the petticoat). Completing the Bodice: The next step is to cut and attach the front/side bodice sections to the back bodice seams on each side. This is a fairly easy process of draping, pinning the material to follow the lines of the linen lining and leaving seam allowances for finishing. The bodice front edges are simply turned neatly over the front edges of the lining and securely hemmed in place (or else turned in and the lining stitched onto them -- this latter procedure works better with a more substantial material such as a heavier silk taffeta or a woollen fabric). The side-back edge of the front/side bodice section is turned in and hand-sewn over the raw edge of the back section on each side. Again, I stitched through the linen lining in order to give the silk more support, leaving about 3.0cm of the seam free from the lining at the bottom of each side-back seam to allow room to maneuvre in attaching the skirts. The remaining (front) skirt panels are pleated, and then the skirts are securely sewn, right sides together from the inside of the garment, onto the bodice in a narrow seam (the front skirts stop a few centimetres short of the lower front end of the bodice). The lining is then turned over the sewn seam on the inside to neaten (in this case the bottom edge of the lining had previously been encased in a finishing band). The pins in the photo below delineate the seam line along the bottom of the bodice front/side to which the skirts will be attached. (I afterward marked this line with thread-tracing in order to have a clear reference from the wrong side when stitching the skirt top to the bodice). Pleating Variations: This is a good point to comment about the direction of pleating in gowns of this 'long-back' type. The pleating pattern and width varies a great deal from the 1740's to the 1770's, both in the bodice back and in the skirts. Some are quite widely spaced, others are closer and denser, although the general trend was from wider to narrower throughout these years (by the 1780's pleating was so narrow and densely packed at the back that the pleats themselves stood out rather stiffly and gave loft to skirts). My research for this particular project also revealed that, of the photographs of two dozen or so gowns I studied from the 1760's period, both extant and in paintings, some of the back pleating was directed away from centre back and some toward centre back. This was a minor point that I hadn't noticed previously. On the other hand, it seems most gowns of this era had their front skirts pleated toward the back (i.e. toward the pocket openings). In my gown, I decided to pleat toward the pockets from both back and front, partly because it was easier to manipulate the pleats in the skirt portion of the centre back panel this way. This may be something to keep in mind when dealing with heavier fabrics, such as wools. 3. Sleeves & Sleeve Flounces: The sleeves were designed based on my research into a number of gowns of the 1760's era, as well as contemporary portraits. I constructed the sleeves together with their linen linings in the method I like to use for 18th century sleeves, that is, a 3-plus-1 seam. This type of seam has been documented in surviving gowns. The procedure involves seaming two layers of the lining with one layer of the silk using a backstitch, turning the silk layer over the seam (creating a felled seam on the outside), and then prick-stitching the silk neatly in place. The result is a very strong seam that is completely finished on both inside and outside, i.e. with no raw edges on either side. It made sense to complete the flounces before mounting the finished sleeves onto the bodice, as I needed to custom-draft the flounces with a little experimenting to get them looking like the painting. (Again, details in the painting are a bit vague; however I referred to a number of extant gowns of similar style from this era to come up with a suitable design in two tiers). Each set consisted of a top ruching, including a narrow section that would cross the visible edge of the sleeve (at the inside crook of the arm). A pretty 4-loop self fabric bow with pinked edges would complete the sleeves (see photos further on of completed gown). 4. Robings & Ruched Trim: I mounted the sleeves to the gown in the usual manner of 18th century construction, while the gown was on my fitting mannequin, after which the robings and serpentine trim were completed. My research into middle to upper class English dress of the era, including a number of cutting diagrams and sketches, indicated that by the 1760's the integral, pleated bodice robings that had been a hallmark of earlier English gowns were being replaced, initially by separately constructed and applied "faux" robings, and ultimately by plain bodice front edges. As I had a number of examples of 1760's gowns to refer to that had the faux robings on the front edges, I chose that style, to be trimmed with applied meandering (serpentine) ruched bands. This was not unlike the gown shown in the photo below (ca. 1760, a silk robe à la française in the MET collection). It seemed to me that Gainsborough's depiction of Lady Howe's gown did not show any clear indication of trim on the opening edges of the skirts themselves, and that there was enough evidence of "plain" skirts in silk English gowns of the era to leave them without ornamentation. The photo below shows the serpentine trim pinned onto the applied robings, to complete the front of the bodice. In retrospect, I probably should have made the robings wider or the ruching narrower and a little less dense, but the end effect, with the stomacher in place, was fairly pleasing (see photos further on). 5. Stomacher & Trim: This was the really fun part of the project! I decided I wanted a moderately embellished faux compère, that is, a 1-piece stomacher with the appearance of a compère (which I had seen on several extant gowns of the 1750's and 1760's). There is almost nothing of the stomacher visible in the Gainsborough painting (in fact it may have been completely plain for all the detail that can actually be seen). Accordingly, I used my own design for the trim, based on fashions depicted in paintings and extant gowns of the period, such as the gold silk gown shown earlier (although that gown appears to have a true, front-fastening compère). The stomacher for this gown consists of a buckram inner layer sandwiched between two off-white linen layers (one acting as a finishing lining at the back), with the silk on the outside. Rather than being simply pinked, the edges of the trim were turned under and secured with running stitches prior to ruching, then neatly stitched onto the stomacher base in fine silk thread using tiny surface stitches and longer stitches on the back. The rosettes were constructed similarly, as shaped circles of the trim. Once all the trim was completed, the linen lining layer was slip-stitched onto the back. The Devil's in the Details! It's an old saying, but often so true ... details can drive you crazy, especially near the completion of a creative project. In historical costuming especially, I feel it's the details, those important finishing touches and accessories, that really make a garment come alive. In this case, the three essential elements to be added that were shown in Gainsborough's portrait (aside from her pretty hat, jewellery and shoes) were:
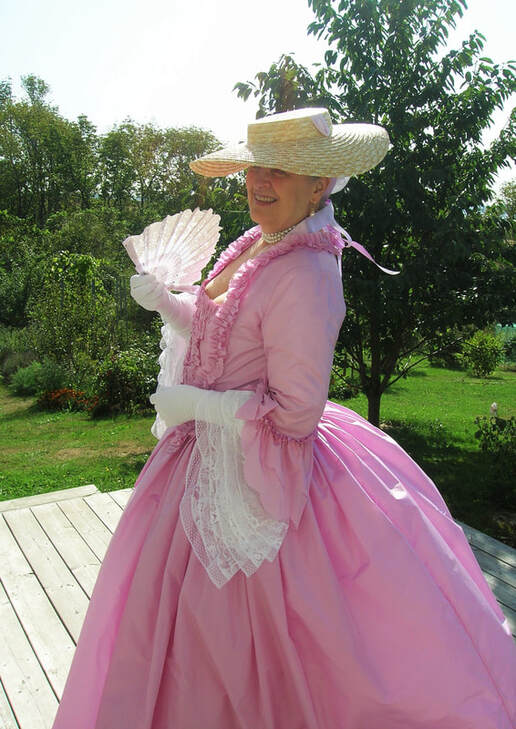
I had lace on hand that I felt would be workable for the engageantes (I'd decided these were to be made of a net lace, with a narrow applied lace edging). I designed these "from scratch", with a bit of trial and error experimentation to get the right shape and size. In the end, they were extravagant 3-layered confections, although perhaps not quite so over-the-top as Lady Howe's engageantes. Actually wearing and moving in the gown gave the engageantes the appearance of more loft and fullness. I was reasonably satisfied with the result, despite the fact that it took me nearly two days to try half a dozen different edging laces before I finally decided on this: The fichu was another matter entirely, and ended up being the bane of the project! As you might recall, I had purchased silk gauze fabric online sufficient to make the fichu and apron. However, once I had it draped on the finished gown, it was clear the colour was wrong, wrong, wrong -- too yellowy-ivory, just too much in comparison to all the other laces. (Whoops!) I must have draped this fabric a half dozen times on the mannequin, hoping each time that it would look more white and less ivory... but it didn't change! (Remember the quote attributed to Einstein about repeating something over and over expecting a different outcome?) This was unfortunate, and it was maddening, as the sheerness and beautiful drape was exactly what I wanted. I next tried draping the finest, sheerest cotton batiste I had (Swiss Nelona), a fabric I'd been reserving to make a set of fabulous Edwardian lingerie. After that came the fine white cotton voile I happened to have on hand. Even these were nowhere near the transparency suggested by the Gainsborough painting. Then I had a sudden flash -- I remembered that years ago I had bought some extremely fine India mull (a loosely-woven, semi-sheer cotton fabric sold in Indian shops as lining). I pulled out what was left of it, luckily just enough to cut the fichu and apron. This looked more promising, and accordingly I even went to the extent of laboriously and carefully hemming the inside edge of the neckerchief/fichu and pinning my edging lace to it. The result was really not bad: I completed the fichu and the apron in this fine India mull cotton. The colour (actually lack of colour) was good, a very clear and pure white, but the more I looked at the fichu and apron together on the gown, the less I like their lack of transparency. In addition, it seemed to me that together, the fichu and apron looked a bit too plebeian for a silk gown, and not really in the diaphanous, luxurious style of these accessories in Gainsborough's painting. I took some photos to be sure that I wasn't being too critical, and (as usual) the pictures made it only clearer. The cotton fichu and apron just did not produce the right effect on a silk gown; rather than enhancing the overall impression, they rather dulled it -- pretty but too simple, more housewife-y than countess-y: There was no question that these pieces would look lovely and proper on a cotton or woollen gown, but not on this glorious taffeta. So I put them away for another day. Well, OK, now I had a real problem. I'd gone through my two obvious options and used up what I had of my best available lace edging. My third choice, and something I'd actually discarded as an option earlier, was a piece of off-white silk organza just long enough from which to cut a fichu and (rather skimpy) apron. It had the right sheerness, the proper luxe appearance, and acceptable off-white colour, although I disliked its stiff, origami-like nature. There was nothing to do but cut and finish another fichu -- another several hours of hand-stitching and trying out one edging lace after another. The apron would be nowhere near full enough as I was barely able to get enough width out of the bit of organza I had. Voilà, set #2 is quite sheer and has a silky sheen, but with a less attractive edging lace on the fichu. Yet pinned on the mannequin with the apron panel, it sits a bit like architecture stuck stiffly around the neck instead of falling in soft folds. Lady Howe's fichu (and probably the apron too) are far more flowing and prettily-draping. All in all, a less than ideal result: Being a stickler for detail has its drawbacks. I'd now spent over a week attempting to get the right appearance in these accessories, had used up all the best edging lace I had, as well as all available appropriate fabric, and was still less than impressed. What does a determined perfectionist do in this situation? Start over, back to the drawing board -- or in this case, to the internet to search for a more perfect fabric. After hours of looking online, having found what I hoped to be the ideal solution, a silk gauze in a 4.5mm weight that I've been assured by the seller is both white and very sheer, I now only have to wait for it to arrive in the mail. And of course, make the fichu and apron all over again! On the positive side, my "faux" 18thC. shoes have turned out beautifully, my bergère hat is the right shape and size, I have a pearl choker necklace, and the proper gloves and fan to complete the tableau. September 15, 2020: Although the replacement fabric for what should be the final iteration of the fichu and apron hasn't yet arrived in the mail, a few days of perfect weather prompted me to try to take some fairly ad hoc photos outside our home, wearing the ensemble as it was so far, fully accessorized or not: And a first attempt (without apron and fichu) to rather loosely capture the effect of the Gainsborough painting, or at least an 18th century "vibe": Then the wind came up, the sun glare became a problem, and so we just had some fun snapping pictures: I would still like to take final photos of the gown, worn with the proper fichu and apron as in Gainsborough's portrait, hopefully in a more suitable outdoor setting. I say hopefully because the window for decent weather will be closing in a few short weeks. Once it gets too cold and the leaves fall off the trees, a re-enactment of Gainsborough's setting will have to wait until next spring. See Part 4 of this project -- as of spring, 2021, I finally got the last chapter of the journey completed! A tantôt!
3 Comments
Rachel Ash
3/4/2021 06:47:49 pm
Thank you so much for this blog! I am working on my first historical gown and I find it very helpful! Your pictures are beautiful.
Reply
27/8/2022 04:42:21 am
Nice blog! You are sharing a wonderful blog with us. Thanks a lot for sharing.
Reply
27/8/2022 05:41:22 am
So informative! Thank you for providing such an informative article. I really benefited a lot.
Reply
Your comment will be posted after it is approved.
Leave a Reply. |
AuthorPatricia Preston ('The Fashion Archaeologist'), Linguist, historian, translator, pattern-maker, former museum professional, and lover of all things costume history. Categories
All
Timeline
March 2024
|










 RSS Feed