|
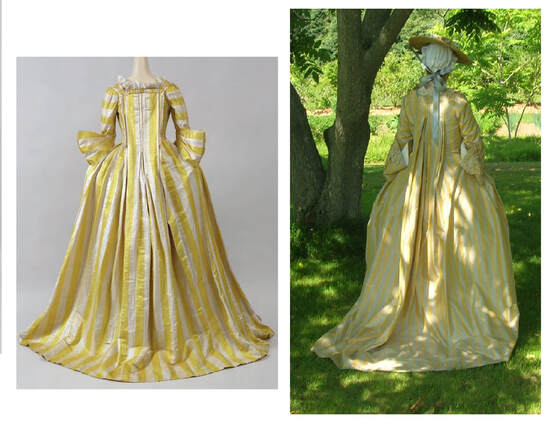
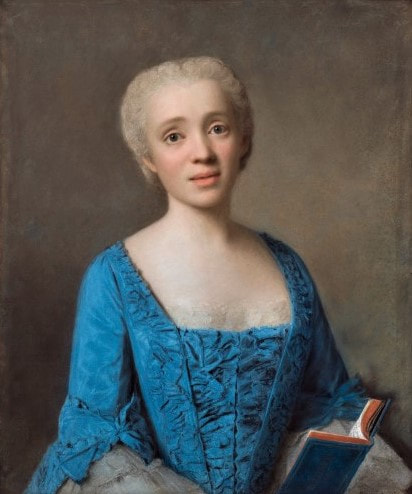
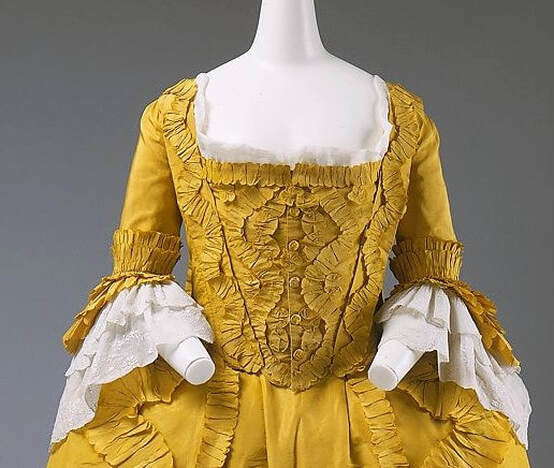
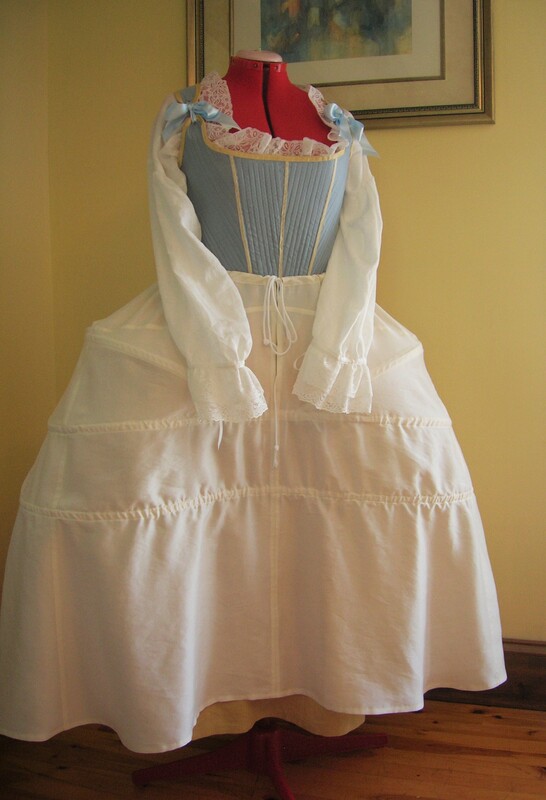
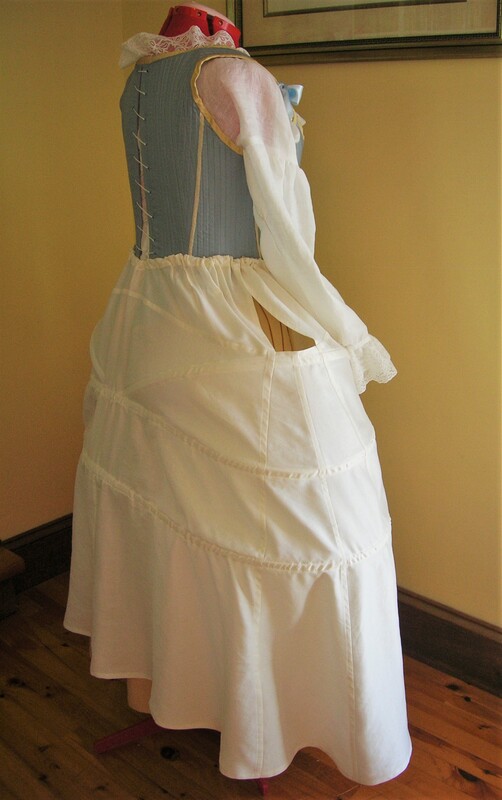
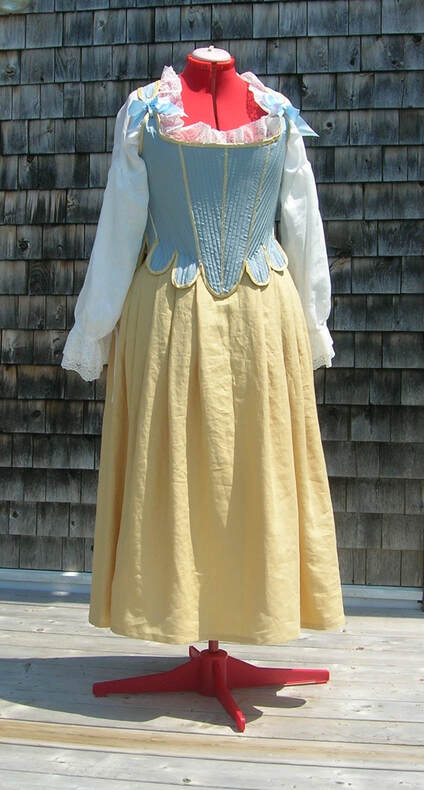
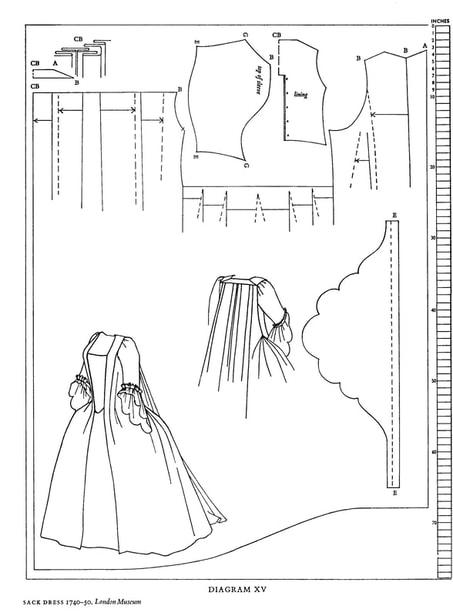
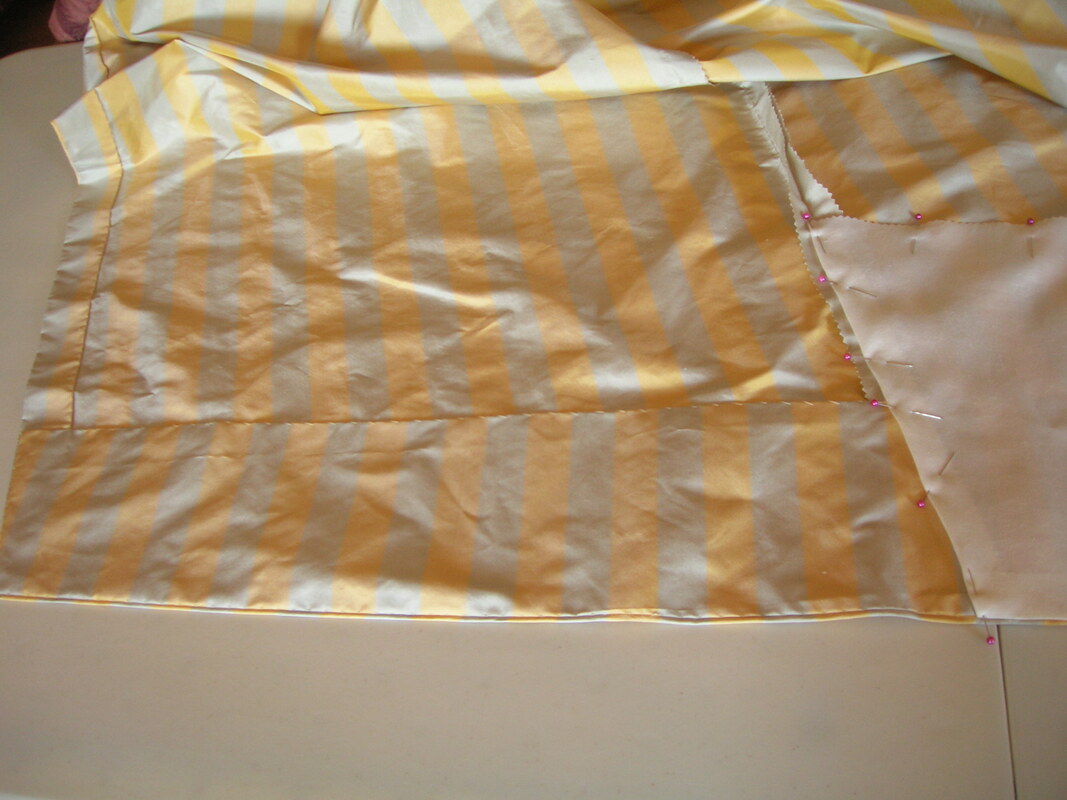
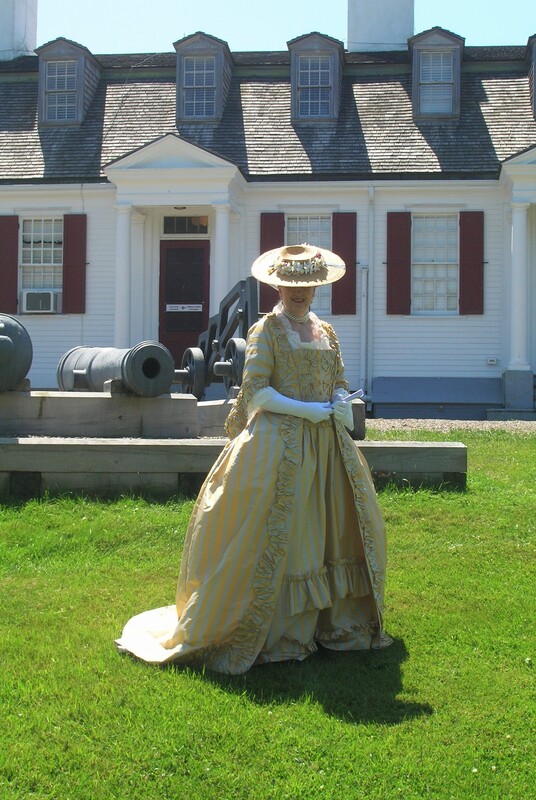
January 20, 2020... It's taken me a few months to get to back to this blog subject, but one of my New Year's resolutions was to try to complete as much of my planned but unfinished work from 2019 (and previous years) as possible. So here, finally, are some details of this 2019 project, from inception to finished ensemble. I think it was the fortuitous find of an almost-matching modern silk taffeta which prompted me to get this ensemble made at last, but it had been in my creative consciousness for some time. In 2019 I decided to just get on with it! Background Notes to Making the Replica: The gown and petticoat are modeled as precisely as I could after an extant ca. 1750 to 1755 robe à la française (usually referred to in English at the time as a "sacque" or "sack" gown or dress) which was offered at a private sale a number of years ago (you may recognize the photos of the original). The notes below give an overview of the project, and following these are details of the steps I took to complete the ensemble. There were some intriguing features of the extant gown that drew me to it, aside from the striking use of the striped textile: (a) First, and most noticeable were the exaggerated but beautifully decorated cuffs (see photo). This style was referred to at the time as "manche à la raquette" (racquet-like sleeve) for obvious reasons, but was a very fleeting fashion. The gown itself was transitional, just on the cusp between the more severe and simple modes of the two previous decades, and the explosion of ornamentation that followed in the 1760's and 1770's. The fact that the owner of this gown chose a sleeve type that was about to go completely out of style (in fact already a little "démodé"), is interesting in itself. I toyed with the idea of making the more fashionable (by 1755) flounced cuffs for the sleeves, but in the end decided I'd replicate the gown exactly as it was, fashion warts and all. (Click on "Read More" at right to see the rest of this article) (b) Second, the owner of the gown chose to have a compère (a usually centre front-closing vest-like section) built into the bodice front, rather than having a separate stomacher, which would have been more usual for this period. In the case of this gown, the compère was actually described as being a faux compère, in that the centre front buttons are decorative only -- the fasteners are in fact hidden at the side. The fashion for compère fronts belonged more typically to the 1760's and later. There is scant evidence of compères on gowns of the 1750-55 period, but they must have been in use by 1750-55, as there is at least one painting of the era, the portrait of the Marquise des Nétumières (dated 1750, by Liotard) that appears to show both a compère and manches à la raquette on one gown. The general style of embellishment, elegantly colour-matched and restrained, is similar to that on the extant gown I planned to copy, the only additional element being the large bows at the fronts of the sleeves in the portrait: Compare the above gown to the compère and bodice embellishment on the antique gown. It does appear that the Marquise's compère closes at centre front (possibly with hooks or pins), but the style is otherwise similar, with its dense surface decoration: The design of the replica compère is shown below (in this photo, the gown edges have not yet had their trimmings sewn on). I slightly lengthened the compère to better fit my personal proportions, and to better hide the top of the silk petticoat. An example from the collection of the MET (Metropolitan Museum of Art) of a comparable sacque gown, but dated a little later (ca. 1760), will illustrate both the similarities to the compère I was replicating, as well as the style differences in the gown itself. Specifically, these differences were the flounced treble sleeve cuffs (designed to be worn with the new "engageantes" -- removable lace or lawn frills), and the somewhat more exuberant gown decoration (foreshadowing the ostentatious embellishment of the later 1760's and early 1770's). My replica gown and petticoat, including all trim, were entirely hand sewn (as the extant gown would have been). Further on are more photos and details of the actual construction. I drafted and adapted some of the smaller bits and pieces (bodice lining, stomacher, sleeves, cuffs "à la raquette" style) from historical patterns and/or drawings taken from several sources such as Waugh, Bradfield, Arnold and others. The petticoat and gown were draped and fitted based on a number of extant sources, photos and diagrams (see photos further on). I tried to replicate the trimmings as closely as I could, based on the little information I had available from a total of just 5 photos of the original gown (they're never from the angle or the close-ups you most want!). The embellishment on the gown front edges consists of ruched meanders in graduating width from neck to hem, with raw edges pinked. It did take considerable trial and error to get just the right combination of width variation and curving. The ruched decoration on the compère and the decorative cuffs is narrower, with edges all turned in and hemmed by hand (in running stitch). I suspect the cuffs of the original may have had a slightly different pattern of decoration, but here I had to use my imagination, being unable to see enough detail in the photos. I did add a protective, second hem facing in off-white silk (see photos further on) because I knew I'd be wearing this ensemble to an outdoor event. I'd learned from sad prior experience how horribly damaged the hem of a trained gown can get when worn walking outside for hours! This facing is loosely hand-sewn on in a way that will make it possible to remove and replace it when necessary. Another lesson I learned decades ago: hike up your train when crossing asphalt roads! There's almost nothing worse than dirty, oily road gunk on a silk train that can't be washed. Lastly, although my goal was to reproduce the extant gown as nearly as I could, I have to say that it may have been a mistake to duplicate the pinked-edge trim on the petticoat for a garment intended to be worn outdoors. Hours of walking around outside, with the wind blowing the gown up and around me constantly, caused the pinked edge of the bottom trim on the petticoat to become abraded and frayed. I had to use a tiny pair of sharp scissors to go over all the trim on the front edges of the gown and on the petticoat to remove the frayed threads later. Making the ruched trim a bit wider to account for narrow allowances, and turning them in with running stitches, while not completely faithful to the original gown, would have prevented the wear and tear. This obviously wouldn't be a problem if the gown were worn gently indoors. Constructing the Replica: 1. All the Underthings The making of any historically-reproduced garment first demands a consideration of the undergarments. To make the outer garment fit into its time period visually means constructing underpinnings that are suited to the era and style of the garment. Usually this requires studying details of underclothes to within a decade or less on either side of the proposed outer garment. In this case, I already had a fine linen shift and silk brocade stays that were appropriate to the 1745-55 period. With so much focus amongst 18th century historical costumers on the American revolutionary period (1770's), it's easily forgotten that fashions of the 1730-50 era differed in some important ways. For example, the gown sleeves of these earlier decades were wider and looser, usually ending in tailored cuffs of some type. The fashionable shifts worn under these gowns had wide, loose, billowing sleeves, often trimmed with lace and cut long enough so that they could be elegantly displayed below the cuffs of the gown. Shifts of this earlier period often also had a lace frill attached to the neckline (perhaps removable for laundering). Below are examples (from about 1740 and ca. 1745 respectively) of wide-sleeved gowns and typical, very full and loose shift sleeves of this type. The second painting shows sleeves of a similar style and cut to that of the antique gown I was copying, minus all the surface embellishment (which was a more typical mark of fashions of the following decade): My shift, in comparison, had the slightly less full sleeves of ca. 1750, with a double lace frill at bottom, as well as the attached neck frill. I used an antique Valenciennes lace in my collection, and although from the early 20th century, it was evocative of some late 18thC. lace designs. The stays were designed for the ca. 1740-60 time period. Next came consideration of the support structure to go under the skirt. I felt that the original ca. 1750 gown was a dressy garment, but not a formal evening or soirée piece. Perhaps it had been a dinner gown, or daytime receiving or promenade gown. As such, I felt it needed somewhat more support than small side hoops, but less than a grand pannier. Accordingly, I adapted a commercial grand pannier pattern that seemed to me to generally follow the structure of surviving historical examples. I reduced its width and circumference, and altered some other aspects of the design to suit my planned gown. The "petit panier" or hoop skirt that resulted is made of silk shantung, using strong, 13mm German plastic boning. This garment, although fairly simple in construction, required a huge amount of just plain sewing, round and round, which I decided to do by machine rather than by hand. I think if I'd had more time to spare, I would have added a pretty box-pleated frill at bottom. I may still do that! Here is the completed hoop skirt, on the mannequin, over the shift and stays (and with the under-petticoat in place -- see description below). I felt this size and shape was just right to properly enhance the finished gown. Although this gown would be worn in summer, I felt that the white shift, translucent silk hoop skirt, and semi-translucent silk taffeta just weren't enough "under-cover" to make me feel comfortable (especially not in strong back-lighting!). So I decided to make a simple under-petticoat from a lightweight golden linen that had enough opacity to block out any potential embarrassment. Unlike the main gown petticoat, the under-petticoat is a simple rectangle, pleated attractively, finished with a twill tape at top, and closing at one side. Lastly came the pockets. These were kept quite plain and simple, mainly because I was getting short of time! They were made of natural linen with off-white linen binding. 2. Fabrics: I got unbelievably lucky with the fabric for the gown itself, a silk taffeta with a similarly-scaled stripe in colours not far off the original, although the original was said to have been made of imberline (a silk/linen blend textile), while my replica was of striped silk taffeta -- close enough! The gown and petticoat were made of the same striped silk. The lining of the bodice portion of the gown was made in a lightweight, off-white pure linen. My existing ca. 1750 shift was made of a very fine, semi-sheer, approximately 3.5oz. 100% linen in natural white. The stays were constructed in 3 layers, the outer two being silk brocade and mid-weight linen (through which the channels were all sewn), and a lining of somewhat lighter weight, natural-coloured linen. I boned the stays in so-called 'synthetic whalebone', my number one choice for 18thC. stays. The under-petticoat was made up in a buttery-soft, light/mid-weight pure linen, and the hoop skirt in a fairly sturdy ivory silk shantung. Taffeta or satin might have been more apt for a fine hoop skirt of this era, but the shantung was at hand, and I had lots of it! For all the linen sections, I used linen or a #30 silk thread for hand-stitching (I actually prefer silk, except for making the eyelets). On all the silk sections, I used a #30 silk thread in a closely-matching colour, and #100 silk thread for areas where I wanted the stitching to be inconspicuous (such as in sewing down the back pleats on the outside). 3. Constructing the Gown Petticoat There are two or three commonly used ways of constructing a reproduction gown petticoat which seemed to me to involve unnecessarily complicated mathematical calculations or trial and error fittings. Being a pattern-maker, I instead devised a simpler method that requires only two measurements, a couple of quick calculations, and a reasonably steady hand and eye for cutting. This method does require all the underpinnings for the gown to be in place, either on a mannequin or on the person to wear the gown. It also relies on the wider widths of modern silk fabrics. I'll be explaining my technique for making a gown petticoat in more detail in another post, but for the moment it's sufficient to say that I was able to cut the basic petticoat in under 15 minutes, and finish hand-sewing it that day. The petticoat was simply two separate rectangular panels, seamed at the sides, and designed with an opening at the top on each side (for pocket access), for which I used the two selvedges of the piece to turn under as a finish. The two top halves of the petticoat were pleated by eye attractively to just a little over the total waist length required, then a cotton twill tape was hand-sewn over the pleated edge on each half of the petticoat, turned over and slip-stitched in place on the wrong side, leaving long tail ends to tie at each side. I hemmed the petticoat by hand. I used the few available photos of the extant gown as a guide for cutting and arranging the furbelows/frills. The wider, top frill was simply pinked on each long edge, gathered evenly, and hand-stitched onto the petticoat. The narrower bottom frill was pinked and knife-pleated, then invisibly tacked by hand lengthwise along its centre. (Later I added tacking near the top edge, as the top had "flopped" down unattractively while I was wearing the gown and being buffeted by the wind -- a point to remember for the next gown to be worn outdoors!). Below are some photos of construction details of the gown petticoat, and the finished petticoat put on the mannequin over the underpinnings I'd be wearing: Below: Detail of the embellishment on the petticoat. In this photo, the hem has been pinned up but not yet sewn in place: The completed petticoat, over all the underpinnings: Notice that on gown petticoats of this era, the embellishment need only extend a little further than where the finished edges of the gown will fall -- the vertical edges of the gown itself will (unless you're in a strong breeze!) hide the fact that the trimmings don't extend all around the petticoat. I should also mention that I had a choice of making a "faux" back to this petticoat, i.e. using a linen panel rather than the same striped silk, which is a technique seen on some extant 18thC. gowns of this type. However I had more than enough of the silk to be able to make a full petticoat of it. Besides, these days linen is often as expensive to buy as some silks! 4. Constructing the Gown In the 18th century, a robe à la française (otherwise known as a 'sacque' or 'sack') would have been constructed from much narrower widths of silk than those available today. This presented the first issue I had to make a decision about. Understanding that 18thC. garment construction followed the realities of textiles of the time meant that my desire for historical faithfulness demanded a consideration of construction in relation to my modern silk fabric. (Actually it's still true today that designers cut garments and patterns to reflect the usual available widths of modern textiles). I felt I had 3 options: (1) I could cut my entire piece of 13 metres of 137cm wide (54" wide) silk taffeta lengthwise in half to approximate the width 18th century silk goods; or (2) Sew a very narrow faux seam down the centre to give the impression of where the additional 18thC. seam would be; or (3) Use the full 137cm width of the silk I had in the most logical and economical way possible. So, which to choose? The 18thC. garments I'd previously made were either made of cotton fabrics that I wasn't loathe to deliberately cut up, or petticoats and jackets of silk, the former making simple use of selvedges as side seams, the latter consisting of fairly small sections that didn't rely on long seams. I pondered over this for some time, and considered the 'cons' of each option: The problem with option #1 was that I would likely end up with large pieces of my expensive and beautiful silk that were unusable for some portions of the gown -- or might have to be pieced, which -- as historically authentic as it may have been, I really didn't want to have to do. The other issue with this solution was that I could find myself having to seam together a selvedge (finished) edge with a raw (cut) edge on some of the larger parts of the gown, requiring one long allowance to be finished by hand somehow. One of the beauties of 18thC. construction was its rational and economical use of selvedges for seams. The problem with option #2 was that a faux seam wouldn't actually serve any practical construction purpose. Unlike a seamed edged, a pocket opening or slash couldn't be easily worked into the faux seam -- and judging by cutting diagrams of gowns of the period, the widths of silk were artfully arranged so as to place the open selvedges where the seams and side openings needed to be. I just couldn't see the sense in risking making a puckered mess of my silk with a continuous lengthwise false seam simply in order to "pretend" the fabric was narrow. The issue with option #3 was that it didn't represent the common construction techniques of the 18thC., and I wanted this replica to be as honest a reproduction as possible. Then it occurred to me that option #3 was in fact precisely in tune with the practice and philosophy of 18thC. garment construction -- using precious textiles as economically and rationally as possible, and with minimum possible waste. Aha, solved (at least in a way I could justify to myself)! Accordingly, I decided to drape my silk gown as logically as possible, making the best use of the 137cm (54") wide fabric. I had noticed during my research that most diagrams and drawings of extant robes à la française appeared to have a seam down the middle of centre back. I realized that if I simply seamed two lengths of my silk together at centre back, the 137cm of width on each side of the gown would not reach all the way to the front edges, given the amount of fabric taken up by the back pleats. This would mean another narrow, long panel would need to be seamed onto the main section at an awkward spot on each side, also resulting in a long length of waste material on each side. These two waste sections would not be usable at all for the furbelow trim (which was cut across the grain, not lengthwise), and were far more fabric than I needed to cut the sleeves and cuffs. As a pattern-maker, I'm used to visualizing and draping garments often based on very little detailed information about cut. In the case of this gown, I had studied several diagrams of similar extant gowns. I realized with a bit of rough first draping that two full widths of my silk, seamed together along their length, could be used to extend from one front edge, then allow enough for the pleating at centre back, and fit around to the opposite side seam. This arrangement would permit me to "hide" the lengthwise seam between the two silk panels under one of the outside right-hand pleats. Now all I had to do was determine the maximum centre back length I required for the two long panels, including a hem allowance and some length to spare for fitting. This turned out to be roughly 2 metres [about 78"]; I therefore cut two full-width pieces of my silk to this length, and seam them together vertically by hand. I reckoned I'd be able to start at the left front edge, drape the entire left front, side, the back pleats, and side back with this seamed double-width panel as far as the right-hand side seam of the gown, with a bit of width to spare. This would allow me to make a careful vertical cut at the left side for the pocket (and bodice side seam) and a horizontal cut in order to pleat the pocket opening at the waistline. The pocket opening at the right-hand side would fall at the top of the two seamed selvedges, so would present no additional technical issues. A third, shorter but narrower panel of silk (about 50cm [20"] wide and 173cm [68"] long) would be needed to complete the gown from the right-hand side seam to the front, with another horizontal cut to fit the right front bodice section. This procedure in fact would create precisely the outline of mid-18thC. gowns I had seen in several diagrammed patterns. That is, the bodice front and skirt front are cut in a continuous vertical piece, a horizontal section with pleating at the top of the pocket is carried over to the longer centre back (where it is pleated), and the bodice and skirt cut in another continuous piece on the opposite side of the body. This general cutting concept was actually a development from the simple T-form of earlier 18thC. gowns. This is much easier to visualize in a diagram than to explain in words, so I include here a copy of a pattern diagram from Norah Waugh's 'The Cut of Women's Clothes' to illustrate the idea. Although the gown below is a little different in some style points (with its folded front robings and flounced cuffs), the basic cut would be virtually identical to the end result of my draping process: Using the procedure described above, the only waste silk would be a smallish piece cut out to fit the left bodice side seam, and one fairly wide piece on the lengthwise straight grain (cut off the right-hand panel), measuring about 80cm by 173cm, from which I could cut the sleeve and cuff sections. Research does indicate that draping on the person was in fact more usual for 18thC. gown makers than our modern concept of making up a gown from a prepared pattern. Likely good gown makers knew enough about cut to be able to start draping clients with seamed pieces of fabric roughly cut to the general shape required. Professional tailors may have developed their own basic blocks/patterns in various sizes, but these would still need to be custom-draped and fitted to the individual during construction. So I was decided on the plan. From this point I was able to easily calculate the approximate amount of silk that I'd require for the basic gown, i.e. 2 x 2metres + 1 x 1.75m, or roughly 6 metres altogether. The petticoat had taken about 3 metres, so I would still have 4 metres left of my original 13m. of silk, more than enough for all the applied gown decoration. 1. Making the Gown (Bodice) Lining Now that I had some idea of how I would drape and cut the gown, the first task was to cut and make up the fitted linen lining. I used an amalgamation of various cutting diagrams of extant gown linings, from a number of sources, made toiles (mock-ups) of the pieces I needed, then draped, graded, and re-drafted them in my own size. I was then able to cut the front and back bodice lining pieces (as well as the sleeves and cuffs) to fit. I'll be explaining the sleeve construction further on. I began with construction of the bodice back lining, from lightweight off-white linen, with an adjustment opening in the typical manner. This is a simple cut slit, with the edges turned back and hand-finished to create a roughly 3cm (1-1/4") gap. Positions for eyelets are marked on and the eyelets stitched by hand (in linen thread). Most sources of the period show these linings as having regularly-aligned eyelet holes for ordinary criss-cross lacing, not spiral lacing. Note that the finished side of the lining faces toward the body of the wearer. Silk satin ribbon was used for the lacing, although a fine cord would probably be better. The side and front sections were next. I had previously tested and graded these pieces in muslin to fit, and drafted my own patterns for them. The body seams were hand-sewn as felled seams, and the front and bottom edges hemmed neatly by hand. I used #30 silk thread for this work, as I simply find it easier to work with. Note that I've turned the front edges to the inside. This is because the front edges of the gown itself will be turned over to the inside as well, creating a smooth surface on the outside, without any visible ridges. Even though meandering trim will be sewn onto the front edges, any ridges might be visible between the curves of the trim if the lining's front edges were turned to the outside and sewn. Here the finished bodice lining is shown from various angles. Note also the red thread-tracing which marks the rotational attachment point for the sleeves, a very important detail. 2. Draping & Fitting the Gown Now that a fitted bodice lining was in place, the draping of the gown itself could be done, based on the measurements and calculations described earlier, using the full fabric width. The genius of having a perfectly-fitted bodice lining is that gown can be built over it with complete confidence that the gown will fit. This concept was revived in the Edwardian era, where bodices (unlike their Victorian predecessors) were built over a separately-constructed, fitted foundation. In fact, an 18thC. "lining" of the type shown above is really not a lining at all in the modern sense; it is a foundation for an outer garment to which the latter is attached. I started by cutting the two full-width, 2 metre lengths from my silk yardage. I had already determined this 2.0m length was sufficient to provide the full length needed from the shoulder point to the bottom edge of a moderately full train, plus generous allowances for turning and finishing. I pinned the two panels together by hand along the lengthwise selvedges -- I aligned the two panels in such a way as to keep the stripe pattern as even as possible across the piece, which did result in wider than normal seam allowances. I then seamed the two panels together using a short, even back-stitch. Since these edges were selvedges, I could leave them as they were and simply pressed the seam open. I began by pinning the top of the wide, seamed panel at centre back, leaving a reasonable top allowance for finishing at the neckline. This represented the maximum top point of fabric that would be required. I then took the left-hand selvedge at this top point on the front and pinned it along the front edge of the lining, leaving a sufficient allowance to turn the silk to the inside. I trimmed some of the excess length off at the top (leaving a generous allowance), turned the allowance under and pinned the folded edge to the linen lining at the level where the shoulder section would eventually overlap (see photo below). It was important at this juncture to stand back and determine whether the front edge of the gown's skirt below the waist fell attractively over the petticoat. The photographs of the original gown showed the gown's front edges falling more or less vertically below the waist. Accordingly, I adjusted the angle of the front edge (at the waist) to best provide for this visually. This part of 18thC. design is more an art than a science. Some modern historical costumers call for a long, V-shaped panel to be sewn to the front of the gown to correct for the angle of the skirt's front edge. However I think this is unnecessary if the gown is designed and cut properly to take this aspect into account. This added V-panel concept may have existed in some surviving gowns, but none of the diagrams of extant gowns that I've researched have this extra section sewn in. It would be particularly difficult to achieve proper pattern-matching in some fabrics (such as vertical stripes) using this method. This method of cutting an additional front skirt section for each side is best used for solid-coloured fabrics or all-over designs. In any case, a simple adjustment during the draping phase resulted in a good front edge skirt angle on this gown. Next, I created the all-important pleats at the side. These would ultimately fall below the waist (to make the skirt fit properly over the hoop skirt). This shaping was done by tucking the fabric folds into a neat inverted "V" shape (see photos) below the waistline at the assumed side seam (because this was a wide, continuous section of fabric, there was no actual side seam on the left side of the gown). The skirt pocket slit would later be cut vertically into the centre of these pleats, its raw edges finished neatly, and the top of the inverted "V" pleats tacked securely together by hand (see details further on). The silk was then pinned smoothly around the underarm area, cutting out some of the excess above the waistline there, and the remaining fabric was pinned onto the side-back, to a point just before the planned back pleats. Obviously the excess fabric above the waist at the side seam (caused by these pleats) would later need to be trimmed away and the fabric smoothed and pinned over the lining to create a joining seam. I then formed the back pleats themselves, locating the centre point and pinning the pleats in place in a way I felt was attractive for the era (using a few mid-18thC. pleat diagrams as guides). This part of the process of making an 18thC. sacque gown seems to cause the most consternation amongst historical costumers, yet it really is a matter of artistic arrangement, following a basic principle of the order of pleating. Generally speaking, the back pleats of a robe à la française were wider in the earlier decades and narrowed toward the end of the 1770's, after which the style faded from fashion. The reason for the wider earlier pleats lay in the development of the robe à la française from its 'robe volante' (also known as 'robe battante') antecedents, the classic so-called Watteau gowns. These were originally loose, flowing, simple robe-like déshabillé (informal or chamber) garments, which later evolved into acceptable day dress. Next, the silk was pinned around the opposite side-back as far as the side of the mannequin (where the side seam would be), leaving a generous allowance for the seam finishing. The remaining (right front) of the gown would be cut from a shorter, narrower length of the silk (as noted earlier), and draped separately. I left that part of the task until later, once the entire left side and back had been completed. At this point, I could return to the left side of the gown and complete the pocket opening. First a tentative position was marked in thread-tracing for the pocket opening after roughly arranging the necessary tucks/pleats for the skirt shaping, keeping in mind how the front edge of the gown was falling. Some trial and error and shifting of the fabric was required during this procedure. (Note that "pocket opening" in an 18thC. gown means a slit to allow access to the pocket(s) worn underneath, not an opening in an attached pocket bag as in modern garments). Incidentally, this draping must be done over the hoop skirt or other support that will be worn with the gown, as the skirt tucks/pleats at the side must create the right shape to fit attractively over the structure underneath. Once the tucks/pleats on either side of the planned pocket opening had been adjusted and arranged neatly, forming a sort of inverted "V" shape, they were basted together in place at the waistline. At this point, the fabric is still all in one piece. Now it was time to cut the slash into the fabric below the waistline, to form the pocket opening. This had to be done deftly and accurately, starting with a very sharp nipped cut at the waistline, and making a clean, straight cut of the required length in the silk below the waistline. To avoid undue fraying the raw edges of the opening were immediately and carefully turned to the inside and neatly hand-stitched in place. Since there was no side seam in the skirt below the pocket opening (recall that my silk fabric wasn't seamed vertically here), I carefully whip-stitched the bottom of the pocket opening to prevent it from tearing further during use (see close-up photo below). The photos here show the process described, from preparing the tucks to the finished inside of the pocket opening and skirt shaping (see captions on the photos): The next step was to cut my third lengthwise (but narrower) panel to the dimensions I had earlier calculated. This panel would form the right front of the gown as far as the right-hand side seam. To make up this last portion of the gown, I first ensured that my initial fabric was draped and pinned on the right side of the bodice lining with its selvedge well enough beyond what would be the side seam, in order to allow for a seam allowance. I then made a lengthwise seam between the 3rd panel and my initial 2-panel yardage by hand (using back-stitches), from the bottom of where the pocket opening was to be on the right side of the gown to the bottom of the skirt. At this point the hemlines of the 3rd panel and the initial 2-panel section weren't completely even, but this would be trued up later. Next, the long vertical opening edge of the gown on the right-hand side needed to be pinned in place (allowing for a generous finishing allowance), before completing the pocket opening and skirt tucks/pleats. Since I now had selvedges to work with, it was a simple matter of turning the pocket opening edges to the wrong side as far as waistline level, and stitching the edges down by hand. I then folded the rest of the fabric below the waistline, origami-style, to create the skirt shaping in an inverted "V" shape, as for the left side of the gown, and sewed this in place at the top as before. The side seam of the right-hand side of the bodice could now be sewn. I did this by simply overlapping the front bodice portion over the back, from the top of the pocket opening (at the waistline) to about 2.5cm (1") below the armscye, trimming away any unnecessary excess on the front portion. This seam was sewn right through the layers of silk and the bodice lining, in a neat, short uneven back-stitch (the gown of course had to be taken partly off the mannequin to finish this. The photos below show the finished results of this process on the completed gown (unfortunately I didn't take any photos of this side in progress). The body of the gown was now substantially draped and fitted. All that remained was to turn the front edges over to the inside, make and mount the sleeves, and apply the small shoulder and upper back finishing pieces. The front open edges of the skirt (i.e. the gown below the level of the bodice lining) were simply turned over and neatly hand-hemmed onto the wrong side. Above the waistline, the front edges of the bodice were turned over to the inside, and the lining and bodice edges neatly hem-stitched neatly in place (I decided to add an extra support strip of linen lining along the front edges before doing this, in order to give them a slightly stiffer support. Although some of these stitches showed through to the outside, the ruched meanders on the surface of the gown would cover them in any case. The back lining was neatly tacked onto the gown's back pleats from the inside, using a herringbone stitch (also called 'catch-stitch'), and the bodice back securely hand-stitched to the lining vertically on either side of the lining adjustment opening. The top front edge of the silk was basted in placed onto the lining, and the silk trimmed and basted around the lining armscye openings. The photos below show the results of this part of the bodice construction (photos taken later, on the completed gown): 4. The Compère (False front/Stomacher) I'm back-tracking a bit in the narrative here, because I actually completed the compère before I finished the front edges of the gown. The reason was simple: I wanted to be sure the front edges of the bodice would fit attractively and at the proper place over the compère when the gown was worn. I pinned the completed compère onto the mannequin, over the stays (but under the bodice lining) so that I could do the final fitting and finishing of the front edges with the compère in place as it would be when the gown was worn. I free-cut the compère itself, first in a toile to test and make a pattern. Once I was satisfied with the size and shape, I cut my pattern from silk, a fine linen backing, a very stiff linen backing, and a mid-weight white linen lining (i.e. 4 layers). The pattern represented one-half of the finished piece, with a seam down centre front. This seam would be overlapped in the silk and fine linen, to create the impression on the outside of a centre front closure. I cut the stiff linen and linen lining on the fold, to avoid having bulky seams at the centre of these sections. The sections were all hand-constructed, with the edges of the stiff linen trimmed and the other fabric edges turned in and sewn neatly together. Duplicating the surface embellishment of the extant compère was fun, although it was a time-consuming task, as all I had to go on was one reasonably close-up photo. Much trial and error, positioning and re-positioning was involved -- and, it seemed, thousands of pins! I used modern metal self-cover buttons, covered in the golden yellow silk taffeta to create the faux button closures. Fortunately the stripes in my silk were just wide enough to cut button covers from one colour! It took some peering with magnifying glasses at the one photo I had to determine how the ruched trim on the original compère was constructed. Unlike the furbelows on the gown and petticoat, the compère embellishment consisted of narrow, ruched bands with both long edges turned under (not pinked) -- a lot of fussy work! I cut the ruched bands across the grain of the silk (as in the original), sewed the edges neatly under by hand with fine, #100 silk thread in running stitches, then pinned and hand-sewed them in place onto the compère. The compère of the original ca. 1750 gown was described as fastening with buttons to the lining under one side of the bodice. However I felt it worked better to simply pin the compère on as one would a stomacher -- which is effectively what it is. This would also allow me to switch the compère with a solid-coloured stomacher if I wanted to do so. Here again I neglected to take many pictures of the process itself, but I think the photos below give enough detail: 5. The Sleeves Next came the sleeves -- I had, as previously noted, already draped, tested, size-graded and patterned the sleeve using several 18thC. diagrams as guides. The sleeve linings were cut identically to the one-piece sleeves, from the same linen as for the bodice lining. In gowns of this era, the sleeves were almost always cut across the grain, i.e. in this case with the stripes running around the arm, not down. The sleeve seam was sewn and finished on inside and outside as was typical for 18thC. garments: first, one single outer silk layer was lapped over the edge of the other combined silk + lining edge to the depth of the desired seam, and neatly sewn with tiny uneven back-stitching. The remaining free lining edge was then turned over the seam on the inside and neatly hem-stitched in place. This completely conceals the sleeve seam on the inside. At the bottom edge, both lining and silk were turned in and hand-sewn together using a traditional 18thC. method referred to by Diderot as "point à rabattre sous la main" (translation: "underhand attachment stitch"), a complicated-sounding name for what is essentially a hem stitch that shows through to the outside as a short running stitch. In 18thC. gowns, sleeves were usually mounted and fitted on the person, the lower approximately half of the armscye seam being sewn first, then the remainder (top portion) of the sleeve arranged neatly to fit, by means of tucks. A separately-cut finishing strip was then sewn over the top of the shoulder, to hide the attachment stitching. This lovely procedure means that the sleeve arranging, fitting and mounting at the top can be done as messily as need be, as none of it will show on the finished gown. Mounting the sleeves however presented a bit of a challenge for me, since I had no one to fit and sew the sleeves with the gown on me, so I had to use my (armless) mannequin. I solved the problem by stuffing some fabric up inside the sleeve (which I knew in advance would fit me), sewing the underarm portion of the seam, testing the fit by trying the gown on, then completing the top of the sleeve with the fabric stuffed back in. This "workaround" did in fact work! Here it should be mentioned that the rotational point (marked earlier on the bodice lining in red silk thread-tracing) was a key part of the process. 18th century sleeves weren't rotated into the armscye the way almost all modern sleeves are. They were mounted in such a way as to follow the natural curve of the arm. This usually placed the sleeve seam toward the inside front of the sleeve, rather than running straight down from the middle of the underarm point. This rotation also meant that the necessary tucking at the top of the sleeve could be placed toward the back of the shoulder, where it would most help to allow for movement of the upper arm. The last item to be done on an 18th century gown after mounting the sleeves is applying the short strip which runs over the shoulder, hiding any messiness (and raw edges) at the top of the sleeve. I decided to leave the decorative, complicated sleeve cuffs until later, so that I could position them properly with the rest of the gown completed. I unfortunately took few pictures of the sleeve construction (probably because I was getting short on time by this point), but the pictures below demonstrate some of the process as shown on the finished gown. 6. Hemming the Gown At this juncture in the construction process, the bottom raw edge of the gown was still untrimmed and unfinished, as well as being uneven at the right-hand side where the narrow panel had been seamed to the main section. Finishing the hem really wasn't as difficult a job as it might sound. I put the finished gown on the mannequin, set to my height wearing 2" heels (as I planned to do), with all the other underpinnings in place, including the gown petticoat. Now it was simply a matter of manually marking the desired hemline with pins all around, making sure that the two leading edges of the gown just barely touched the floor and were the same on each side, tapering in a smooth curve around to the back. The very back centre of the gown needed no adjustment at bottom, aside for allowing for a 4cm hem allowance (actually, this would be a turn-under allowance, as I planned to create an applied hem facing (see below). Once I had marked out the hem with pins (leaving enough for the 4cm allowance), I pinned the entire hem edge up to the inside. I then removed the gown from the mannequin, folded it in half at centre back and checked that both halves of the hem more or less matched evenly. I next trimmed off any excess all along the hem (i.e. leaving the 4.0cm allowance), then cut out a strip of the striped silk to make a fairly deep hem facing. This strip had both lengthwise raw edges turned to the wrong side and pressed, and then I pinned its lower edge just a scant 0.5cm above the turned-up hem edge of the gown. I then neatly hemmed the facing in place along its bottom edge. The top edge of the hem facing (because it wasn't cut on the bias) needed to be shaped a little by making small vertical tucks here and there to make it fit the gown. Once this was done, I pinned the top edge in place and hemmed it as invisibly as possible to the gown, using fine #100 silk thread in a matching golden colour. In the following photo, taken later (after a second, protective off-white silk facing had been applied), you can see the details of the striped silk hem facing. I designed the striped silk facing to be deeper towards the back of the gown, to give extra body to the train. In this photo, the striped silk applied hem is at bottom. 7. A Protective Idea Since I knew I'd be wearing this gown outdoors, walking over pathways and probably some grass, I also knew from long experience that the underside of a trained hem would take a beating from such use. I really didn't want this fine silk taffeta gown to be stained and soiled, but I knew it was likely. I also knew that I'd rather not have to risk having the gown dry-cleaned. I turned to a solution I'd used in the past on some Edwardian reproduction gowns -- a deep applied hem facing, made of a fabric matching the weight of the gown fabric, but a fabric that could be discarded and replaced with another facing if soiled. In this case, I used an ivory silk shantung with a pearly surface that was just as light in weight and almost as crisp as the taffeta. I'd been lucky enough to pick up over 20m of this fabric years ago at an incredibly low price, and I'd used it in many different ways. It was perfect for this application. I decided to leave the inside front portion on each side of the gown without this protective facing for two reasons: (1) the ivory colour of the shantung would be awkwardly visible whenever the front edges of the gown opened a bit; and (2) I assumed the front edges of the gown weren't going to get the brunt of trailing on the ground in any case. The facing was cut on the straight grain, about 25cm (9") deep, which I thought would be deep enough to protect the most vulnerable part of the skirt hem. You can see from the photos below how I attached this protective facing -- the top edge was first pinked, and the bottom pressed under by about 1.0cm, then the whole thing pinned onto the inside of the hem, just barely above the hem edge. I started the ivory facing at the right-hand side seam of the gown, and ended it at about the same distance from the front at left. The top edge needed to be slightly tucked here and there to fit the slight curve of the skirt toward centre back. Since the whole purpose of this facing was to make it easily removable, I used long running stitches at bottom, and loose overcasting at top, done in very fine #100 silk thread in a golden colour matching the gold of the gown. In case you're wondering -- yes, the protective facing did get a bit soiled and grass-stained, but actually not badly enough to remove it (yet). To be reviewed again after another couple of wearings! Incidentally, this method can be used on any gown with a train, but if the train is deeply curved, a bias-cut facing will be easiest to apply. 8. All the Pretty Furbelows Finally -- it was time to put the embellishment on the gown! I wanted to complete this step before finishing and mounting the decorative cuffs so that I could judge the effect of the gown as a whole when trying to best position the cuffs. The ruched trimming (referred to in the era as "furbelows" from the French "falbalas") on the front openings of the extant ca. 1750 gown was pinked on both long edges, then pleated and twisted to form a meandering, curving pattern. The key point, as was clear from the photos of the original, was that these meanders were cut across the striped grain and increased in width toward the bottom of the gown. Before cutting into my silk, it did take some calculating and a few experiments on short samples to determine the best way to gradually increase the width of this trim, while maintaining an even-looking, serpentine design with the ruching. Once I had worked this out, it was a matter of carefully cutting the necessary total lengths (for each side of the gown) in smoothly graduating widths, as strips of cross-cut silk. This took up a surprising amount of yardage of my 137cm (54") wide silk -- a good 3.0m (about 3-1/2 yards). When all the strips were cut for each side (and I had made certain the strips were the same for each side), I then seamed each set of strips across the width (I believe I ended up with just 3 seams for each long strip), and pinked each long edge. Now the part of the task requiring great care and a good eye for balance began. Rather than attempting to gather the entire strip for each side in one long line of stitching, I decided to do the ruching by hand, pinning the tucks and gathers as I applied the strip to the gown. Anyone who has ever had to apply gathered, pleated, or ruched trim to a reproduction historical gown will understand the concept of divisions that I used. I started pinning at each end (top and bottom) for a few centimetres, then pinned the approximately mid-way point. I divided the top half and bottom half again in half, and marked those two centre points. Now it was a relatively easy task to arrange the ruching evenly and attractively in each of the 4 sections, ensuring that the whole line of ruching would be reasonably evenly tucked and gathered. The other edge of the gown was done in the same way, except that it was definitely easier having a "template" to look at, already pinned, on the other edge. Once all the pinning was done on both edges, I carefully hand-stitched the furbelows onto one edge of the gown with fine #100 silk thread, using tiny running stitches. Here are a few photos showing the arrangement and pinning of the furbelows along the gown's front edges: 9. Constructing and Mounting the Cuffs One the final steps was to draft and test a toile pattern for the wide "à la raquette" cuffs. I based the pattern generally on diagrams and sketches of extant gowns with similar cuffs (most from the late 1740's), but my cuffs needed to be quite an exaggerated size and shape to duplicate those on the extant gown I was copying. Accordingly, it took 3 or 4 versions before I got what I felt was the proper balance of length and size. Once the pattern was cut from the striped silk and linen lining, the actual construction was quite simple. The real test came in positioning the cuffs on the gown. I must have spent three hours trying to get the placement just right! Since I had virtually nothing to go on in this regard from the photos of the extant gown, it was a matter of judgement: which position looked best on the gown, how they would look when actually worn, whether the decorated face would display properly when worn, how much depth of the sleeve was needed to support the top of the cuff etc. etc. Once I had the placement marked with thread-tracing, I was able to focus on the surface decoration. Once again, there was little detail visible in the photos of the extant gown. So I essentially repeated the embellishment I'd done on the compère, referring to what I could glean from the pictures of the antique gown. Making, placing, pinning and hand-stitching these ruched meanders onto the cuffs took almost as long as the embellishment on the gown itself, but I think I got a good result! The ruched meanders were stitched onto the cuff by hand with very small, spaced running stitches, using fine #100 silk thread. In retrospect, the only thing I would have done differently would be to give the cuffs a stiff but lightweight interlining (perhaps organza?). My worry at the time was that if I made the cuffs too heavy, they'd just droop. As it turned out, the cuffs rested quite nicely on the top of the "shelf" created by the hoop skirt when I was walking. 10. Finishing Touches The final bit of embellishment-- a true pleasure to do -- was to make and apply the short ruched strip along the upper back of the gown. After peering at the photos of the extant gown for what seemed like hours, with and without a magnifying glass, it appeared that this ruching was similar to the ruching on the sleeve cuffs, i.e. narrower, with both long edges turned under. I constructed this ruched strip, and applied it by hand with each end turned under and neatened over the wider furbelow ends at the upper shoulder. Compare the original (or at least what I could see of the original) with the finished replica gown: Some Final Thoughts on Making (and Wearing!) the Replica This beautiful ca. 1750 surviving gown had impressed me from the first time I found the photographs. Having now actually duplicated it as closely as I could, I'm still impressed at the fine balance between colour and design, and between display and restraint. I think I like these mid-18thC. gowns better than the overloaded decoration and ostentation of many surviving silk gowns of the 1760's and 1770's. The original gown (at least in the photos), made of a silk/linen blend textile, had an intense lustre that even my silk taffeta wasn't quite able to match. I also didn't quite manage to duplicate the colours or the exact width repeat of the stripes (which in itself formed part of the design), but I believe I got close enough, considering I never did have access to the gown itself, nor enjoy the resources to have the textile custom-reproduced. It was such a pleasure to wear this gown when the time finally came. The area where I currently live (in Nova Scotia) has a deep history, and every year at the beginning of August one of the episodes in that history is re-enacted during what is called "Natal Days". A (British) military encampment at Fort Anne as it might have been seen in the late 1740's is done, along with a battle re-enactment on the grounds of the fort. Many people arrive in 18thC. dress, both civilian and military -- including some French soldiers, one of whom posed in the photo below. It was such fun for my husband and I to portray a prosperous merchant and his spouse of the era, letting people see an example of fine period dress that might have been worn in this area at the time, and adding a little extra entertainment and colour to the day. I'm sure we'll be there again in 2020. Surprisingly, although I had the entire kit on walking around for nearly four hours on a rather hot summer day, I was completely comfortable, thanks as usual to all the linen underthings. What did I most learn from this project? The sales prospectus for this gown (from many years ago) pointed out the "expertly applied" meandering surface embellishment. Like many replica projects I've done, my biggest takeaway was a deep appreciation for the skills, patience, and technical mastery of the original maker, whoever he or she might have been.
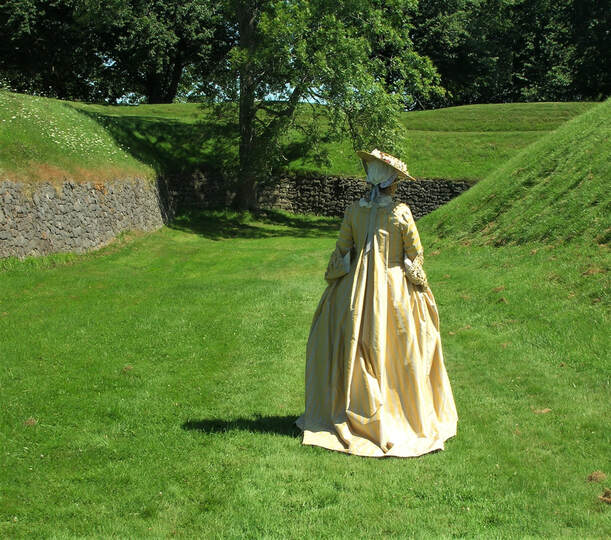
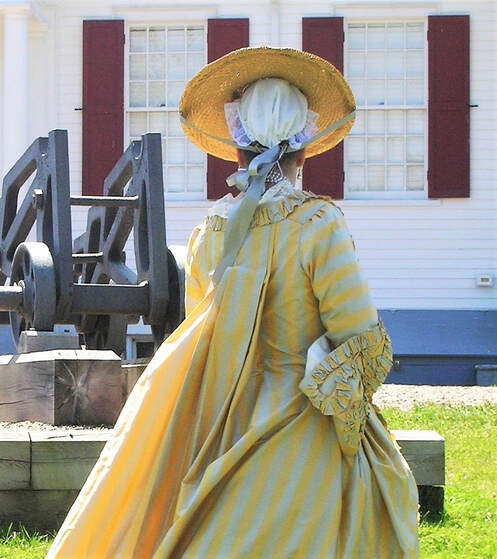
I also gained a fuller understanding of the personal fashion options that a woman of about 1750 might have had available to her. In other words, like today, a certain amount of individual choice -- even if not strictly currently fashionable -- can go into putting an ensemble together. In the case of this ca. 1750 gown, the owner clearly had the maker of the garment include elements that she personally liked, but that were already a little "old-fashioned". Unfortunately there was no information at all about the original owner, or where the gown was made, although the use of the imberline textile points to a likely French origin. And of course, no real understanding of a garment that was meant to be worn can be appreciated without actually wearing it. This project was never meant to stay on a mannequin or in a closet, but to complete the circle of design, execution, and wearing. I did have trouble with the stiff breeze blowing the day most of the pictures were taken -- a few extra pins into the compère would have helped to keep things in place! Below are some photos of the gown as it was worn, mostly taken at the Fort Anne National Historic site in Annapolis Royal, Nova Scotia, Canada. Although there would never be any information on the provenance of the extant gown -- or even where it had been made -- and although I would never have an opportunity of examining the gown myself, following in the footsteps of the original maker to re-create it was both a joy and a privilege. I hope he or she would have approved.
3 Comments
Nina Virgo
20/9/2020 06:28:58 pm
Hi, thank you so much for such a detailed post on the construction of this gown. I am in the process or recreating a version of this gown myself and it has been very interesting to read your process. I do have a question about the trim on the gown, Can you tell me what widths at the shoulder and at the hem you used? Many thanks in advance.
Reply
The Fashion Archaeologist
28/9/2020 06:23:49 pm
Hello Nina! The ruched trim required a bit of experimenting with muslin fabric in order to get the right proportions of width from top to bottom of the gown front edges. As with most gowns of this era, the trim widens from shoulder to hem. In the end, from carefully examining the photos of the extant gown and after a couple of experiments, I settled on a 5.0cm (2") width at the shoulder, gradually increasing to a 9.0cm (3-1/2") width at the hem.
Reply
21/7/2022 02:34:20 am
Thanks for sharing this useful information! Hope that you will continue with the kind of stuff you are doing.
Reply
Your comment will be posted after it is approved.
Leave a Reply. |
AuthorPatricia Preston ('The Fashion Archaeologist'), Linguist, historian, translator, pattern-maker, former museum professional, and lover of all things costume history. Categories
All
Timeline
March 2024
|












 RSS Feed